When I was a kid, one of my all-time favorite things to do was to play with Playdough, specifically the Play-Doh brand-name product which is the best-known variety. I can't tell you how excited I was at the sight of those familiar yellow tubs. I loved everything about it—the different colors, the fun texture and elasticity, and most of all that I could create anything I wanted with it. There's even something special about the smell of this stuff. It's just awesome all around.
Now that I'm grown up and I've got my own kids, I've noticed that they love Playdough just as much as I do. They want to collect every single color available, and they make the most magical creations! I love nurturing their creativity, plus Playdough is perfect for sensory play.
I was noticing the other week that my youngest tries to eat the stuff sometimes. This seems pretty common; I mean, I tried it when I was a kid too. Thankfully a lot of Play-Doh is nontoxic. But I did take a look at the ingredients in a tub of brand-name Play-Doh, and here is what I found (from the patent information):
- Water
- A starch-based binder
- A retrogradation inhibitor
- Lubricant
- Salt
- Surfactant
- Hardener
- Preservative
- Fragrance
- Color
- Humectant
- Borax
- Petroleum additive
I'm not even sure what half the stuff on this list actually is. I mean, what the heck is a "retrogradation inhibitor?" And petroleum additive? That doesn't sound like something I want my kids eating. Of course, I don't want them eating Playdough at all, but I can't be watching my littlest one every second she's playing. It doesn't help that a lot of kids like to shape their Playdough into colorful food items!
So I decided I wanted to make a safe homemade alternative. Most recipes you can make at home use only simple, safe ingredients you probably already have on hand in your kitchen cabinet. I am going to share a number of really awesome Playdough recipes with you in just a moment.
Why Make Playdough At Home?
I think I've already kind of gone over this, but safety isn't the only reason. Here are a few more to consider:
- If your kids are fascinated with Playdough, they can make it with you and have fun learning in the process! One of my children is a born scientist. She is always making things, and she has had a blast with me trying out different recipes and comparing how they turn out.
- For children who enjoy sensory play, it can be fun and educational experimenting with the different outcomes of different recipes.
- Your children will have so much fun choosing whatever colors they want. Like I said, I remember when I was a kid, I wanted every color of Play-Doh in existence. My own kids are no different. They used to constantly beg me for more colors at the store. Now they are having fun mixing food coloring together and coming up with their own custom colors. Personally I think that is a lot more fun and creative!
And like I said before, these recipes are safe and natural. Many of them are for edible Playdough. It is always best for your kids to play safely!
So now let's check out 8 awesome homemade Playdough recipes!
8 Best DIY Playdough Recipes
1. No-Cook Playdough Galactic Glitter Recipe from PBS
Here is a recipe from PBS Parents, complete with a tutorial video!
This was one of the first playdough recipes that I found. When I watched the video, I just had to try it! This recipe makes glittery purple playdough. It really does have a very cool "galactic" look about it.
No-Cook Playdough Recipe Ingredients
- 4 cups of flour
- 1 ½ cups of salt
- 1 cup of water
- 2-4 tablespoons of oil (you can use any cooking oil)
- Red and blue food coloring
- Glitter
The red and blue food coloring makes a purple color, but you can substitute any colors you want. You also get a different look with different colors of glitter.
No-Bake Playdough Recipe Directions:
1. Start by pouring the water into a bowl.
2. Next, add your food coloring. How much you want to add is entirely up to you. The more you put in, the more saturated the final color will be.
3. Stir it all together.
4. Add in your flour and your salt. At this point, it is a good idea to stir it up a bit, but you don't have to mix it thoroughly just yet.
5. Add in your oil. It is the oil which makes this a no-cook playdough recipe. Without the oil, you'd get a very crumbly mixture. How much oil you need depends on the exact texture you want to achieve. I suggest you start with just two tablespoons, stir it up, and add in more as needed.
6. Add in as much glitter as you want. If you let your kids do this part, I guarantee they will have a great (and messy) time.
7. Knead everything together. This will result in a soft dough.
You can store this no-bake playdough for as long as you want. Just seal it up inside a plastic container or bag. This will keep it from drying out. My kids really loved this recipe because of the glitter.
2. Simple Edible Playdough Recipe
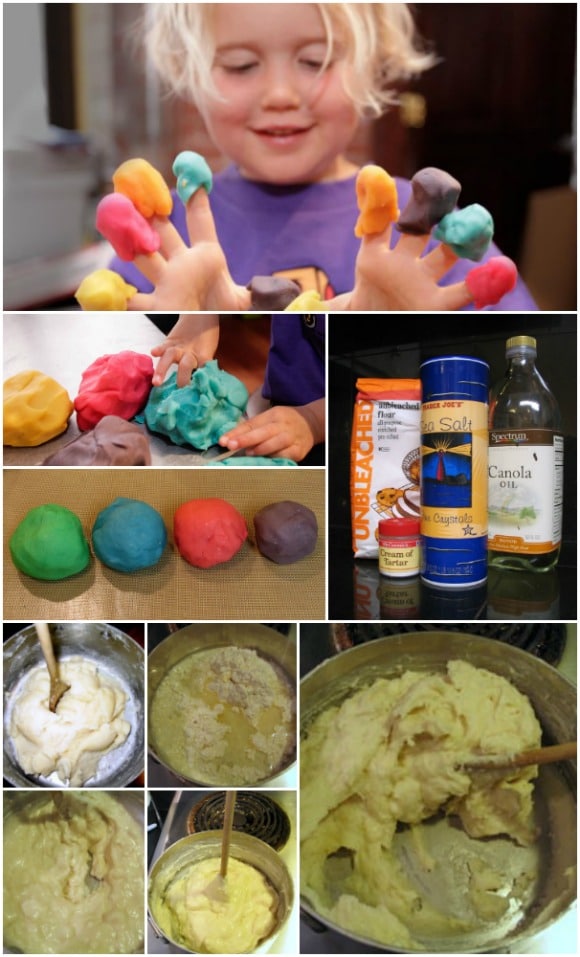
Here is a simple, all-natural recipe which is totally safe and edible for kids who just can't seem to keep playdough out of their mouths. It comes from Instructables. Here is a shortened version of the ingredients and steps.
Simple Edible Playdough Recipe Ingredients
- 2 cups of flour
- 2 cups of warm water
- 2 tablespoons cooking oil (any oil of your choice)
- 1 cup of salt
- 1 tablespoon cream of tartar (you do not have to include this, but it does improve the elasticity)
- Food coloring
1. Mix all the ingredients except for the food coloring together in a saucepan. Turn the stove on low and continue to stir everything together until you get a consistency like mashed potatoes. Eventually the dough will start to clump up in the middle of the pan. At this point it is done cooking and you can pull it off the heat. Another sign that it is done is if it is no longer sticky. If you do find that it is still a bit sticky, just put it back on the heat and mix it together a little bit longer.
2. Start kneading the playdough and forming it into balls.
3. Make a divot in the middle of each playdough ball and deposit a few drops of food coloring.
4. Fold over the dough and keep kneading until the color is evenly distributed in each. You can add in more food coloring as needed to achieve the hue you want. I should note that you need to be careful not to stain your hands with the concentrated food coloring, but once it is distributed into the dough, it will not stain your hands or surfaces.
Like the recipe above, you can store this one in a plastic airtight container or bag. It keeps for a long time in good conditions. If it starts to dry out, you can add a little water to make it soft again. If it gets too damp, you can put it back on the stove to dry it out a little.
3. Homemade Playdough with More Shine
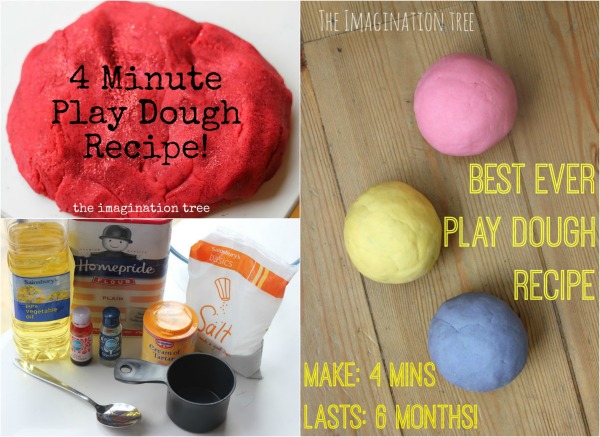
This is a recipe from The Imagination Tree which was created to replace another recipe that blogger Anna used to use. Her goal was to make playdough which was softer and wouldn't dry out even if it was played with over the course of the whole day.
Ingredients:
- 2 cups of flour
- 2 tablespoons of cooking oil
- 2 tablespoons of cream of tartar
- 1 ½ cups of boiling water
- ½ cup salt
- Food coloring
- Glycerin
Directions:
1. Begin by mixing the flour, oil, cream of tartar, and salt in a bowl.
2. Next, boil the water.
3. Add your food coloring to the boiling water.
4. Now pour the boiling water with the food coloring in it into the bowl full of dry ingredients.
5. Stir the mixture until it gets sticky.
6. Add several drops of glycerin, which produces some extra shininess.
7. Wait for the mixture to cool down after you stir in the glycerin.
8. After the mixture is cool, you can turn it over on a cutting board and knead it until it is no longer sticky. If you are having a hard time getting rid of the stickiness, work in a little extra flour and it should go away.
According to Anna, this mixture keeps very well, so you can store your homemade playdough in an airtight container for up to six months.
4. Lavender Playdough
Here is another cool recipe from The Imagination Tree. This one is for lavender-scented playdough!
Ingredients:
- 2 cups of flour
- ½ cup salt
- 1-1 1/2 cups of boiling water
- 2 tablespoons of cream of tartar
- 2 tablespoons of vegetable oil
- ½ teaspoon of food coloring
- Several drops of glycerin
- 3-4 lavender floor heads (pull them apart)
Directions:
1. To make this recipe, you basically follow the same instructions as you do for the preceding recipe. Start by mixing the dry ingredients while you are boiling the water separately. After the dry ingredients are mixed, stir in the oil. Then pour the boiling water in.
2. Finish mixing everything together. Knead the mixture until you achieve a sticky consistency.
3. Now add the food coloring.
4. Finally as the last step, add in your lavender.
This recipe works really well if you use the food coloring to mix a shade which is close to natural lavender. You then have playdough which looks and smells like lavender! You could also try simple alterations to this recipe with different types of flowers—for example you could make pink playdough with crushed-up rose petals.
5. Kool-Aid Playdough
Here is a video which teaches you how to make your very own Kool-Aid playdough:
In case you can't watch videos, here are the instructions:
Ingredients:
- 1 cup of flour
- ¼ cup salt
- 1 cup of warm water
- 1 package of Kool-Aid (any color and flavor)
- 2 tablespoons cooking oil
- 2 tablespoons cream of tartar
Directions:
1. Start by combining the dry ingredients in a saucepan.
2. Add in the oil and warm water.
3. Put the saucepan on the stovetop and cook over medium for 3-5 minutes.
4. After a while, the mixture will solidify and gather in the middle of the pan in a ball. At that point, you can remove it from the heat.
5. Wait for it to cool down.
6. After it is cool, you can knead it until you get the perfect consistency.
Like the other recipes here, this one can keep for some time. But make sure that you keep it in a sealed container or bag. It is also suggested that you store it in the refrigerator.
6. Glow-in-the-Dark Playdough
This recipe for glow-in-the-dark playdough will thrill any kid! It comes from BeforeAndAfterTV, the same channel which brought you the recipe above for Kool-Aid playdough.
Ingredients:
- 3 cups of flour
- 1 cup of salt
- 1 cup of warm water
- 2 tablespoons of oil
- Food coloring
- 6 ounces of non-toxic glow-in-the-dark paint
Directions:
1. Start by mixing together your dry ingredients in a large bowl.
2. Next, pour in your warm water, followed by the two tablespoons of cooking oil.
3. Stir all the ingredients together and knead the playdough as well as you can.
4. Next, pour in the glow-in-the-dark paint.
5. Knead the mixture until you get the perfect playdough consistency.
6. Take it out and form balls with it. Make divots in the balls and add in your food coloring to each. Then fold in the dough until the food coloring is nicely distributed.
7. Charge up the glow-in-the-dark paint. The best way to do this is to cover the playdough with plastic wrap to prevent if from drying out, and then shine a bright light on it. You need to do this for around 15 minutes (at the minimum).
8. Turn off the light and plug in a black light. When the black light shines on the playdough, it will glow.
This is a very cool recipe and is sure to thrill any kid. I'm an adult and even I want to try this! Glow-in-the-dark playdough is something I always wanted when I was a child.
7. Jell-O Playdough
You may have already guessed this, but just as the Kool-Aid drink mix works great for coloring playdough and making it smell phenomenal, the same can be accomplished using a packet of Jell-O.
Ingredients:
- 3 cups of flour
- ½ cup of salt
- 1 cup of hot water
- 3 tablespoons of cooking oil
- 6 ounces of Jell-O
Directions:
1. Mix the flour, salt and Jell-O in a bowl.
2. Add in the oil and stir.
3. Pour in the boiling water and stir that in. When it is well-mixed, knead until you get the texture that you want.
8. DIY Crayon Playdough
It isn't uncommon to catch a child gnawing on a crayon. I have no idea why; they taste awful. Okay, the very fact I know that proves I tried it when I was a kid too. Maybe it's the bright colors. Maybe it's just sensory curiosity. In any case, crayons are made to be non-toxic for just that reason, even if ingested.
This makes them a great ingredient to use to dye homemade non-toxic playdough! Here is a recipe video on YouTube from the channel Our Family Nest:
Ingredients:
- 1 ½ cups salt
- 3 cups of flour
- 2 tablespoons cream of tartar
- 4 tablespoons of vegetable oil (2 per batch)
- Water
- 2 crayons (1 in each color you want—this recipe is for two batches of playdough in two different colors)
Directions:
1. Start by mixing the flour, salt, and cream of tartar together in a saucepan.
2. In two separate bowls, crush up the crayons (one crayon per bowl).
3. Turn the stovetop on medium and heat up two tablespoons of vegetable oil. Add in one of the crushed-up crayons. Stir it up and wait for it to melt and combine completely.
4. Start adding two cups of water, pouring it in just a little at a time.
5. Pour in the dry ingredients. Remember that this is enough to make two colors of playdough, so you just want to pour in half of the dry ingredients. You will use the other half to make your next ball of playdough. Keep mixing while you are pouring. If you pour in all the water and you still do not have the desired consistency, you can add in a tiny bit more until you get it.
6. Once it firms up into a ball, you can dump it out of the saucepan onto the countertop or a cutting board and wait for it to cool.
7. Once it cools off sufficiently, you can knead it to get any excess flour fully integrated.
After that, you just repeat all of the steps above to make the second color/batch of playdough. Then you can have fun and play!
Fun Playdough Games, Projects, and Activities
So now that you have made your playdough using the YouTube playdough videos above, what can you do with it? Obviously you can just let your kids have at it and let their creativity run wild, but some children, especially younger ones, need a little push in the right direction to know what to do. Plus, while kids love coming up with their own activities, it can be fun for them to participate in activities which are given to them too.
So I have searched the web to find some fun ideas for sensory play activities using playdough which are great for younger and older children!
1. Playdough Mats
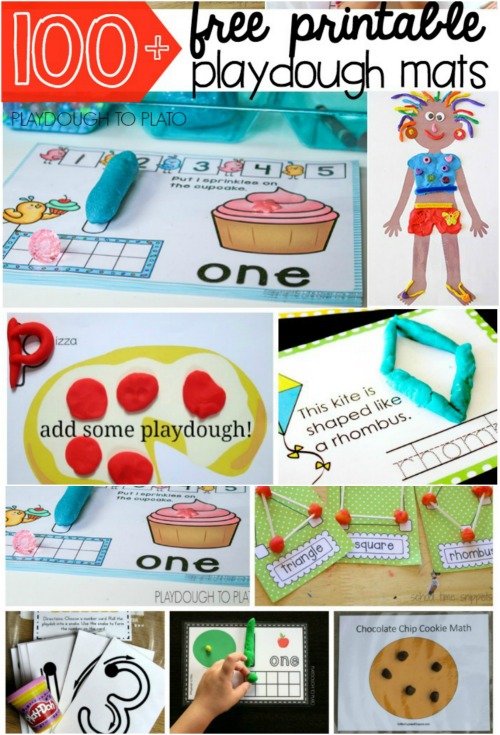
Playdough mats are a clever learning tool which you can use if you want to provide your kids with fun and educational playdough activities. With playdough mats, you can teach literacy and math skills as well as motor skills.
There are a ton of free printable playdough mats online; they are very popular. In fact, you can download 100 of them here! I recommend that you laminate them before use so that they can be re-used time and again without the playdough sticking to them.
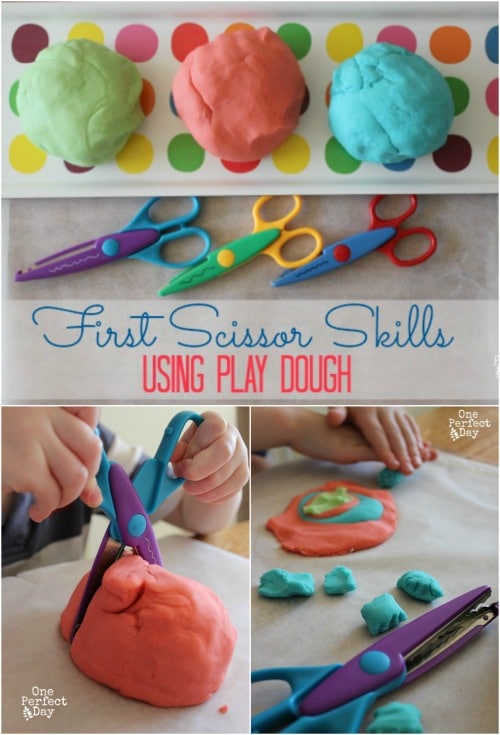
2. Teach Scissor Skills
Scissors are very tough for a lot of children to learn how to use safely and correctly. You might think that it makes sense to let them practice on paper, but this actually can be incredibly frustrating. The paper likes to bend and fold, which can make it hard to grip it firmly with the scissors. This can stand in the way of the learning process when it causes kids to become discouraged.
The solution? Let your kids learn by cutting playdough instead. Once they get that down, they can progress to paper. They will probably have a lot more fun anyway.
3. Subtraction Smash
If you are looking for a fun and easy way to teach your kids more about math, you can do it with playdough. This game is called "Subtraction Smash," and the idea comes from the blog Mama.Papa.Bubba. The concept is simple; you give your child a card which lists an equation, for example "3 – 2." Your child then makes 3 balls out of playdough and smashes 2 of them to get the answer: 1 remaining ball of playdough.
Naturally this can lead to all kinds of laughter and fun; children love smashing things. But instead of being destructive, all that violence towards the playdough is actually teaching them constructive math skills!
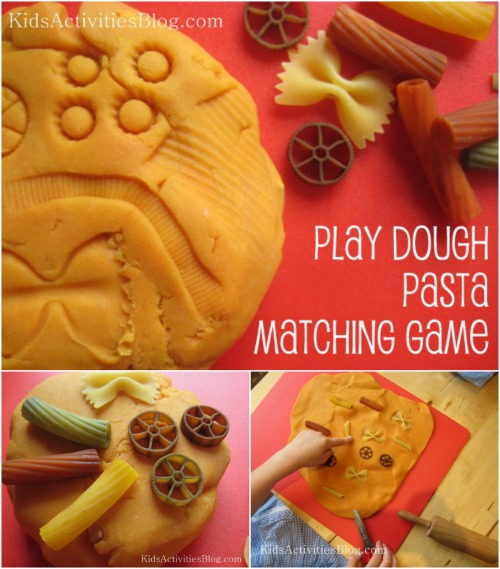
4. Pasta Matching Game
Pasta comes in all kinds of fun shapes and colors, which makes it a blast to mess around with in sensory play activities. But what happens when you put playdough and pasta together?
From Kids Activities Blog comes an excellent idea for teaching kids about shape recognition. Let your kids flatten out a piece of playdough and then make imprints of noodles on it by pressing pasta pieces down on it. Then have them remove all the pasta and set it aside. After that, ask them to try and figure out which pieces of pasta created which shape imprints.
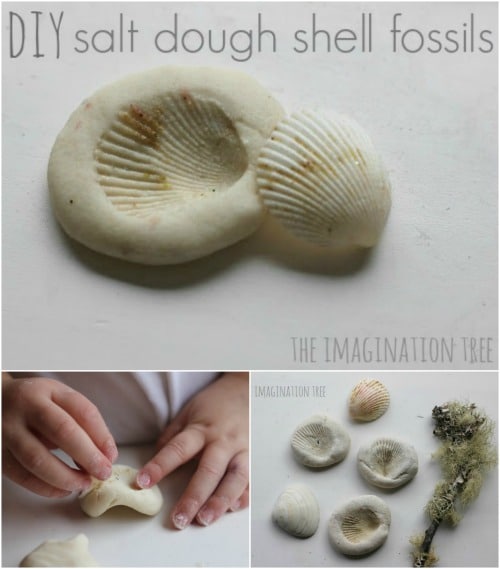
5. Shell Fossils
This idea actually originally used salt dough, which you can bake—so with it you can create permanent works of art. But you can also do it using playdough. Like the pasta activity above, making shell "fossils" is a great way to educate your children about shape recognition while also providing a basic lesson in paleontology!
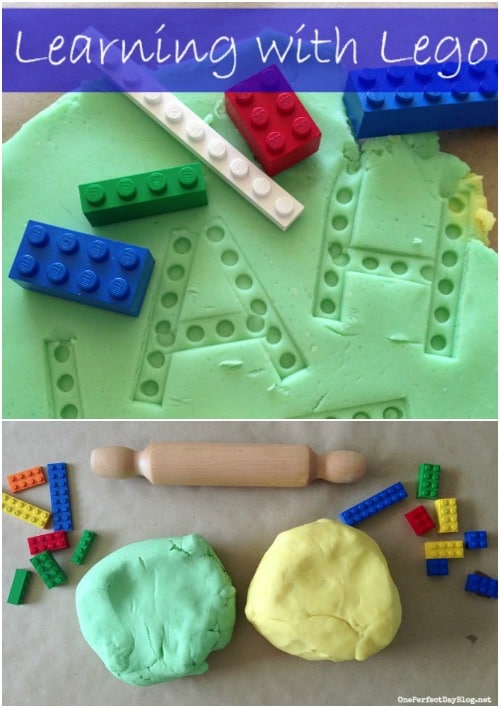
6. Lego Learning
Two of my favorite toys in childhood were Lego bricks and playdough. But never once as a child was I clever enough to think about combining these two interests. As it turns out, there is a lot you can do with Lego bricks and playdough. Your kids can "build" 2D shapes and letters by making clever imprints, and they can also embed or bury the bricks and dig them up from playdough landscapes while coming up with fun stories.
7. Color Playdough with Markers.
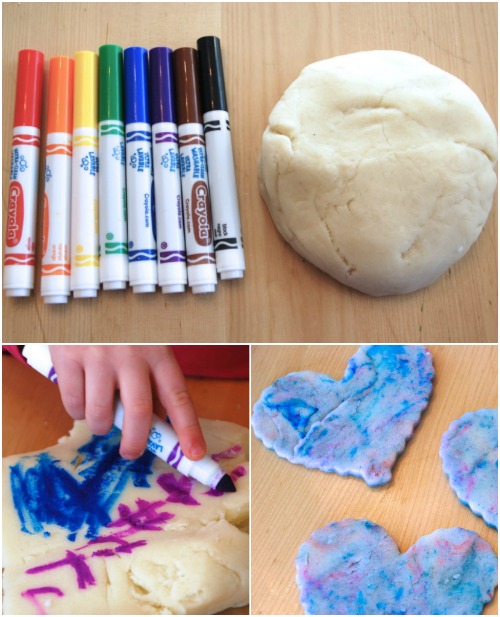
Part of the fun of playdough is all the bright colors. But just because your playdough already has a color (if you made it that way) does not mean it cannot have even more colors. Kids can have a great time drawing on playdough with markers and then reworking it into different shapes to see what happens to the lines they've drawn. Because DIY playdough is cheap and easy, you do not need to worry about them "ruining it." You can always make more!
8. Geometric Imprints in Playdough.
One of the very few things I remember clearly from grade school was those colorful geometric blocks. I was obsessed with making the largest and most complicated symmetrical designs that I could out of them. Well, if you buy a set for your kid, they can have fun making geometric imprints on their playdough. This is another way to teach shapes!
9. Construct 2D and 3D Shapes
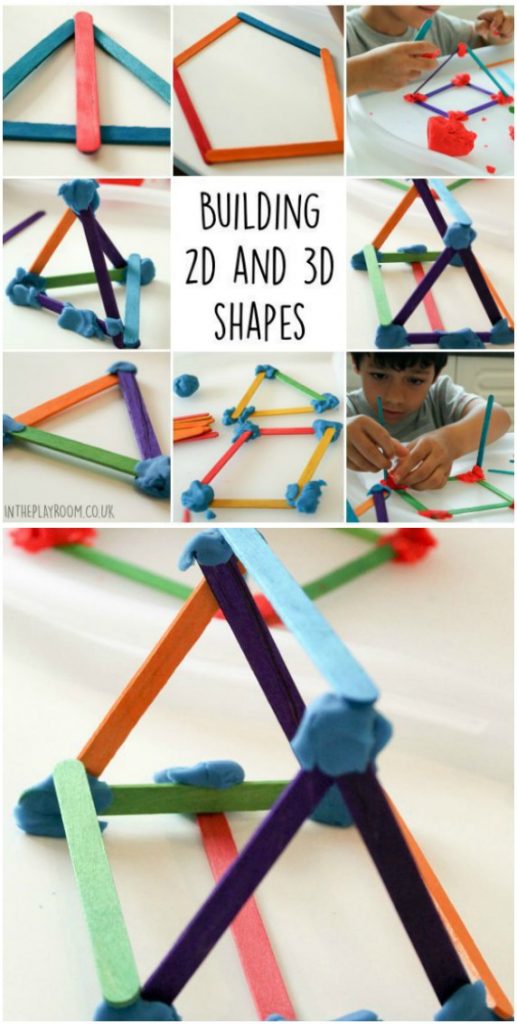
Do you have a little structural engineer? If so, you can cultivate that budding interest in engineering and construction with playdough and craft sticks. Children can start by learning how to build 2D shapes, and can then progress to building 3D structures. The DIY playdough does a great job holding the forms together and stabilizing them.
As you can see, there are tons of awesome ideas for playdough toys and games which you can play with your children! So have fun making your own playdough and then enjoy these activities together!



No comments:
Post a Comment