Thursday, August 31, 2017

25 Rustic Shiplap Decor And Furniture Ideas For A Farmhouse Look

1. DIY Shiplap Fireplace Backsplash

DIY Shiplap Fireplace Backsplash
If you have a fireplace, why not consider adding some shiplap to the section above the mantel? This is a great idea if you just want to incorporate a bit of shiplap into your décor but don't want to do an entire wall. It will instantly bring the attention to your fireplace which should probably be the focal point of your room anyway. Plus, it's so easy to add a shiplap wall section to this small area and it makes a really huge statement wall.

Source/Tutorial: harvarddesign

2. DIY Shiplap Attic

DIY Shiplap Attic
If you want to add dimension and character to your attic space, you can definitely do that with shiplap. Add this concept to your walls and ceiling. It looks really nice for alcoves, too. This is the perfect way to update your attic space and turn it into more than just a simple storage area. Plus, it's pretty easy to do and something that you can handle yourself without worrying about hiring a contractor.

Source/Tutorial: mainehomedesign

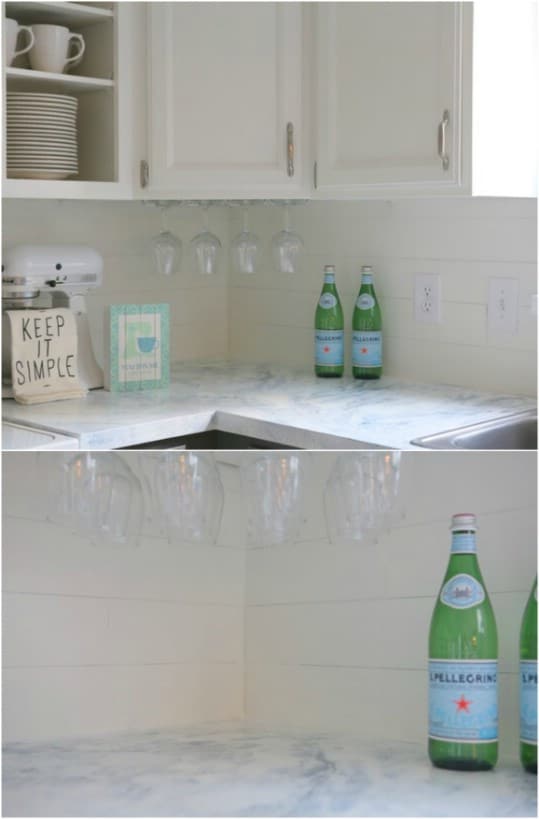
3. Faux Shiplap Kitchen Backsplash

Faux Shiplap Kitchen Backsplash
This idea gives you the look of shiplap without all the work. You can create a beautiful kitchen backsplash that has that wonderful farmhouse shiplap look by using peel and stick flooring instead of actual boards. If you're looking to upgrade your kitchen and give it that great country farmhouse look, this is definitely something that you want to try. It's easy and absolutely stunning when it's completed.

Source/Tutorial: allthingswithpurpose

4. Easy Colored Shiplap Walls

Easy Colored Shiplap Walls
If you want to add the look of shiplap but you want to also draw more attention to a certain wall, paint the boards before you hang them. I love this black shiplap wall. It's such a wonderful focal point and such an easy fix, too. This would be great in a bathroom or even as a statement wall in the bedroom or kitchen, depending on the color that you choose to paint it.

Source/Tutorial: studio-mcgee

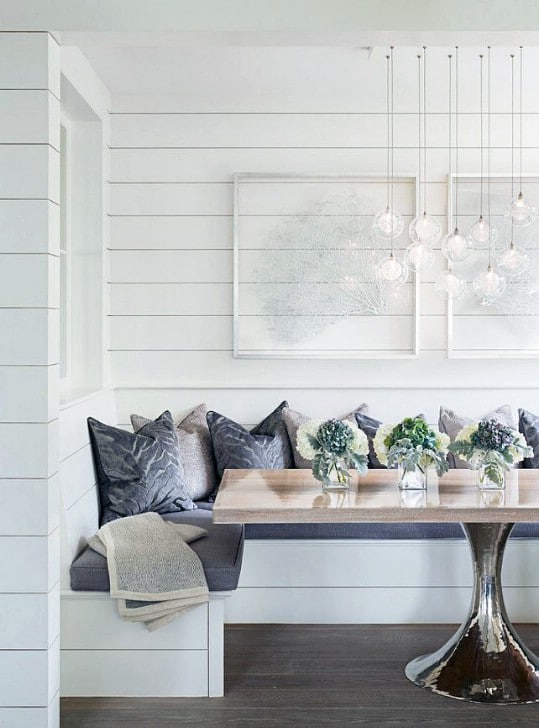
5. Rustic Shiplap Breakfast Nook

Rustic Shiplap Breakfast Nook
Turn that breakfast nook – or the corner of your kitchen – into a beautiful farmhouse styled eating area when you add shiplap walls. You don't have to do the entire room. Just redo the walls around the area where you have a table and chairs or bench. This would add a lovely rustic country look to any kitchen, even if you don't have a dedicated breakfast nook.

Source/Tutorial: jacquelynclark

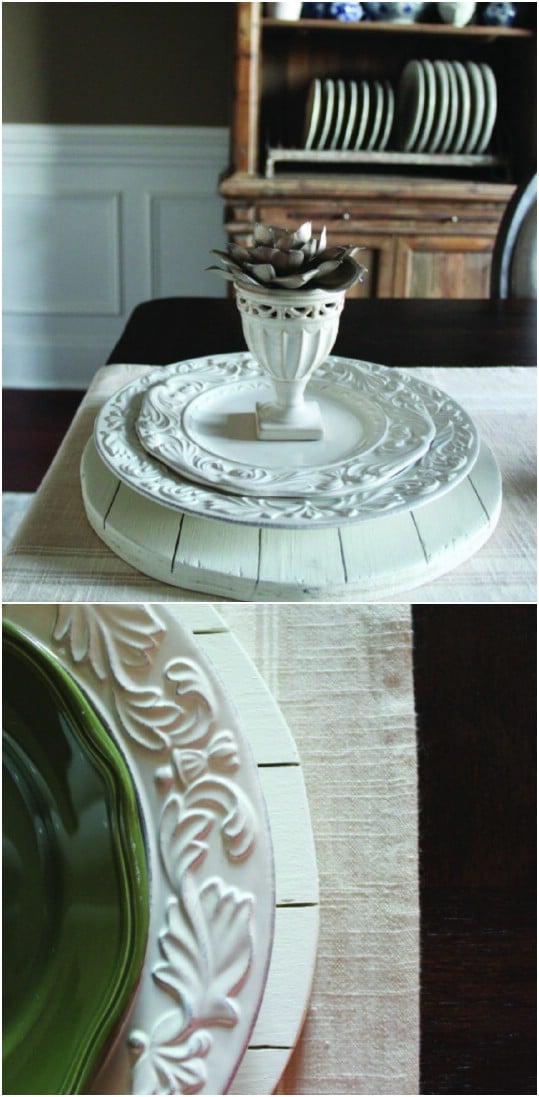
6. DIY Shiplap Inspired Charger Plates

DIY Shiplap Inspired Charger Plates
Turn ordinary charger plates into farmhouse styled décor when you add shiplap. You can do this with actual shiplap boards, just glue them together, but an easier way would be to cut the round and then style it to look like shiplap. This would be beautiful to display dishes on a farmhouse table and it's such an easy plate to create.

Source/Tutorial: thehambyhome

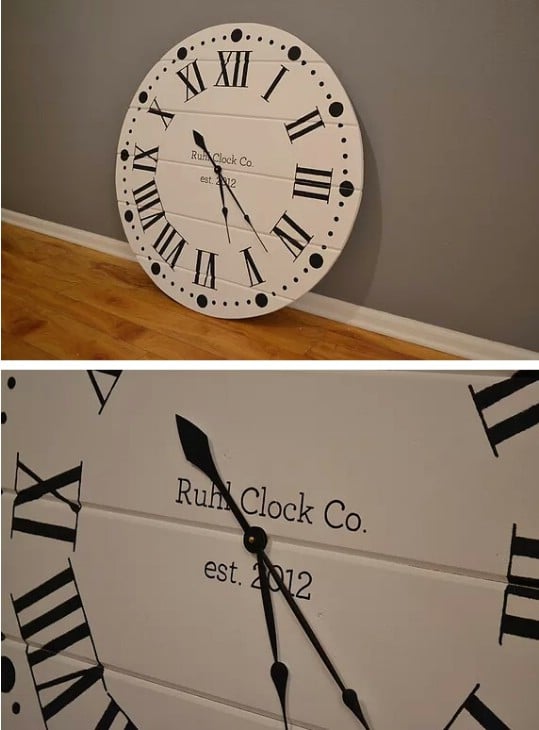
7. Gorgeous Shiplap Clock

Gorgeous Shiplap Clock
If you're looking to add farmhouse charm, a shiplap clock is a must and you can build this one yourself really easily. You can buy these of course at most high end department stores but they're not cheap. You can build one yourself for a fraction of the cost and still get a great shiplap styled clock. You'll need shiplap of course, as well as a few power tools and a clock kit to make it.

Source/Tutorial: homemademidwest

8. Shiplap Chair Rail

Shiplap Chair Rail
You can turn an otherwise ordinary wall into something spectacular when you add a chair rail with shiplap. Just measure your wall up to where you want the chair rail to begin and add your shiplap to the floor. Then separate your walls with decorative moulding and you're all done. I love this idea for contrasting colors. Maybe paint the shiplap white and have a slightly bolder color on top.

Source/Tutorial: houseofturquoise

9. DIY Shiplap Kitchen Island

DIY Shiplap Kitchen Island
Your kitchen island can become the focal point of the room when you redo it with shiplap. This is such an easy way to implement this farmhouse styled décor into your kitchen and it doesn't take that long. You can just add the boards over your existing island exterior to add a bit of dimension or completely redo it in shiplap style – your choice.

Source/Tutorial: remodelaholic

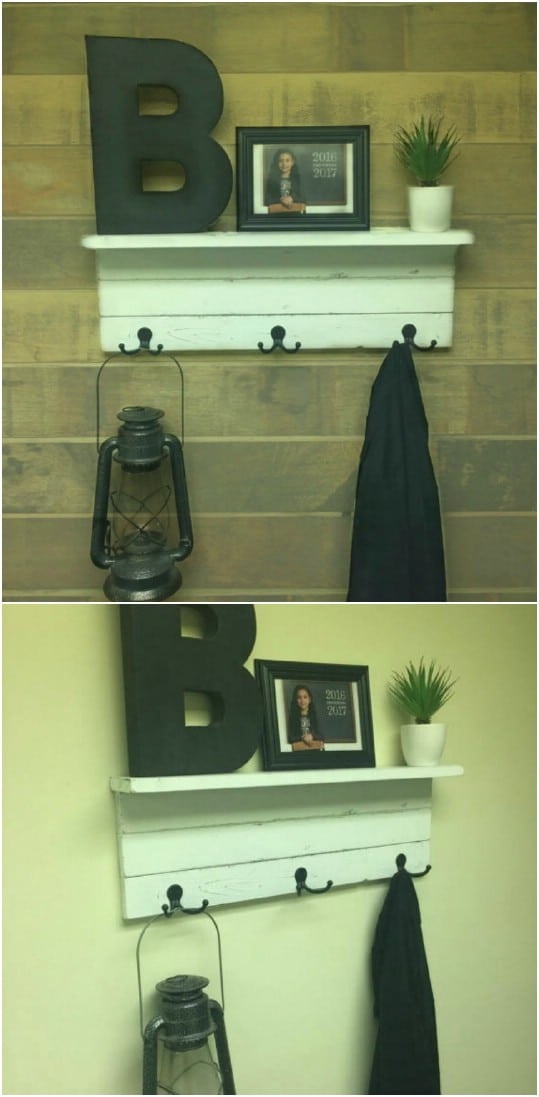
10. Hanging Shiplap Coat Shelf

Hanging Shiplap Coat Shelf
I love this coat shelf that is made from repurposed boards. It has that great farmhouse look and can be hung in the hallway or entryway if you have a foyer. The hooks are perfect for holding coats, umbrellas, or whatever else you need to hang and it definitely has a great decorative property to it. I found this one on Etsy for $69, but you could easily DIY it if you prefer to do it that way.

Source/Tutorial: etsy.com

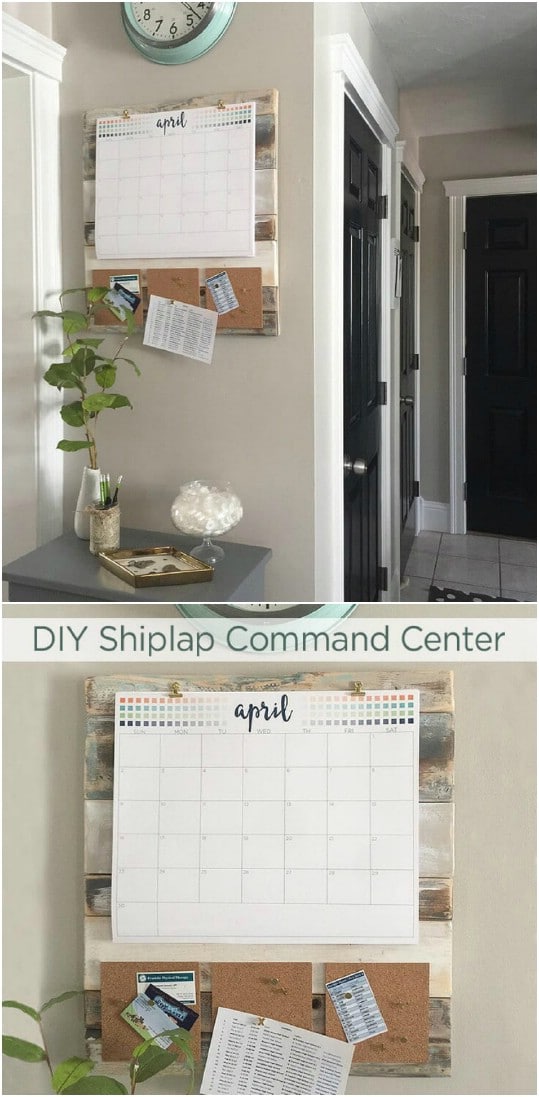
11. Rustic DIY Shiplap Command Center

Rustic DIY Shiplap Command Center
I absolutely adore this command center. It has that great farmhouse quality and is perfect for busy families, and you can build it yourself in just a few hours. You just join your scrap pieces of wood and then add your calendar and maybe some mini clipboards to keep track of receipts, bills, and whatever else you need to have a handle on. This is such an easy project and would look perfect hanging in the kitchen or in your home office.

Source/Tutorial: kenarry

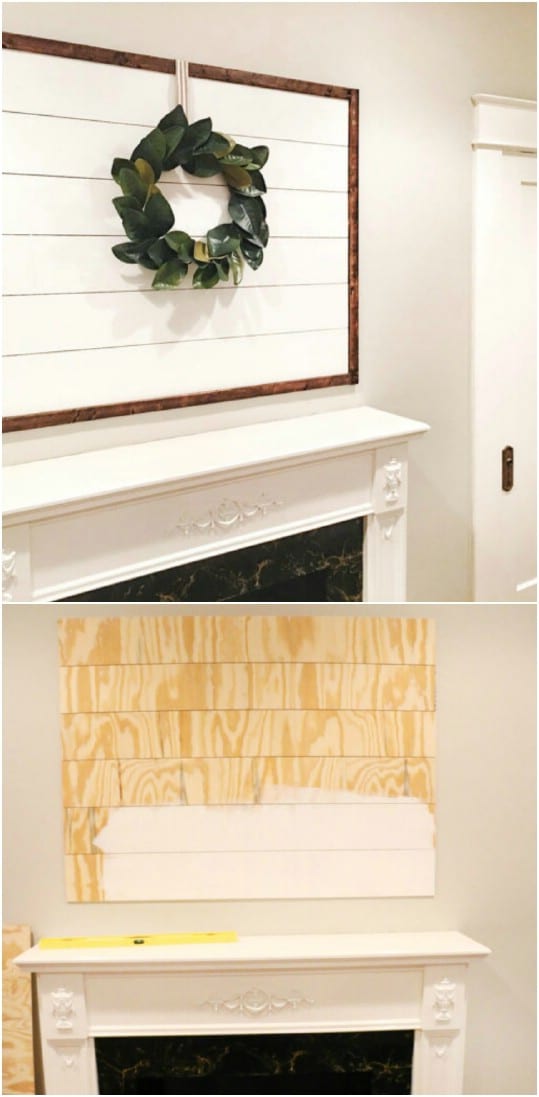
12. Beautiful Framed Shiplap Art

Beautiful Framed Shiplap Art
Turn those extra pieces of scrap board into this beautiful artwork. If you want a quick and really easy way to add shiplap to your home, this is it. You just take those pieces and put them in a frame. You can use that framed art to show off wreaths or other flora or just hang them as they are.

Source/Tutorial: athomewithnatalie

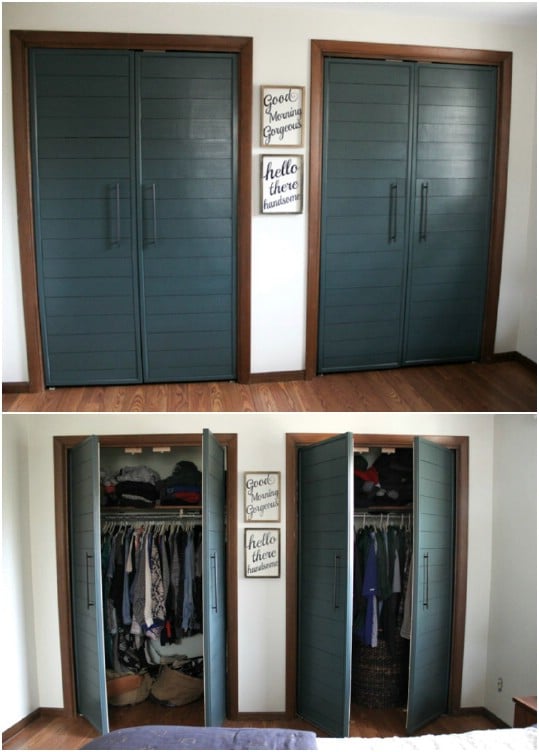
13. Faux Shiplap French Closet Doors

Faux Shiplap French Closet Doors
If you're looking for a way to add shiplap to your bedroom and you don't want to do an allover wall redo, consider adding these lovely french styled doors instead. They have that great shiplap look without actually being shiplap. You use strips of plywood to create the look and it's a beautiful way to add a little farmhouse style to the bedroom or you could totally do this in the bathroom or hallway on any closet that you want to redo.

Source/Tutorial: brightgreendoor
20 Fabulously Decorative Ottomans You Can Easily Make Yourself

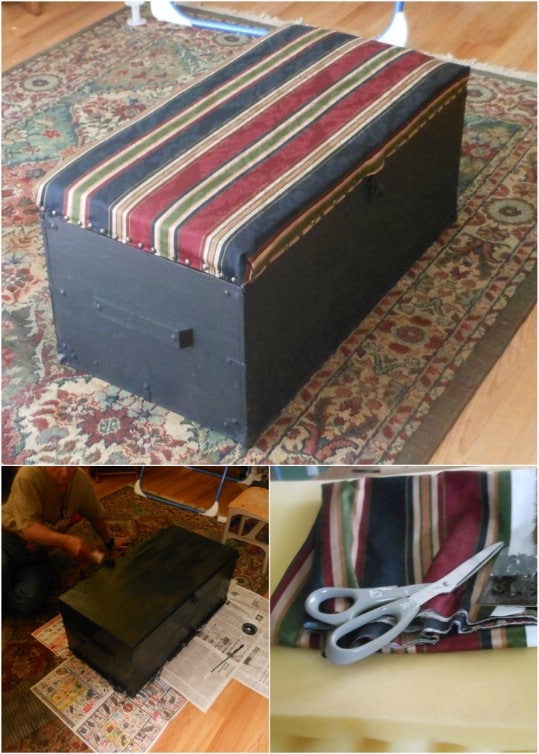
1. Repurposed Army Footlocker Ottoman

Repurposed Army Footlocker Ottoman
An old footlocker is the perfect size and shape for making an ottoman. You just have to add some padding to the top and maybe repaint the footlocker if you want to change the color or update it. Then just top it off with upholstery material and some decorative nails or rivets and you're all done.

Tutorial/Source: instructables

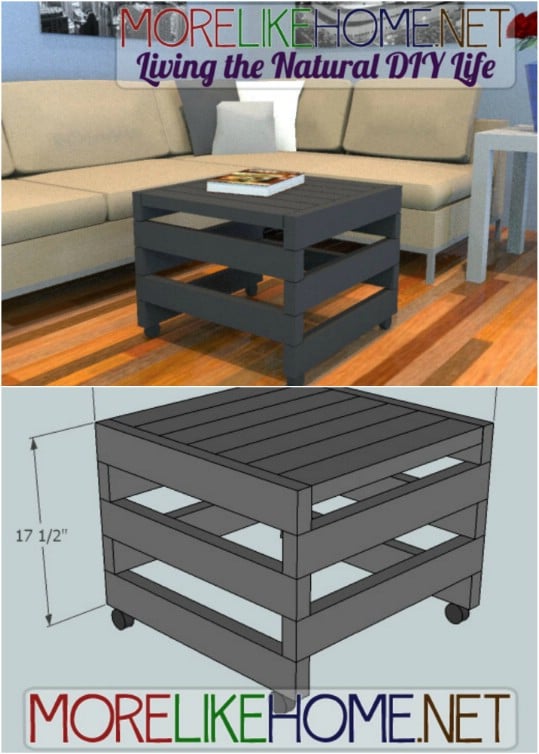
2. Easy To Build Rolling Ottoman

Easy To Build Rolling Ottoman
You can build this rolling ottoman with a few 2X4s and some other supplies. This ottoman has a very modern look combined with rustic charm. I love the black but you could stain or paint this any color you want. It has a very pallet like look and the rolling is provided via casters although you could just as easily leave those off if you don't want your ottoman to roll.

Tutorial/Source: morelikehome

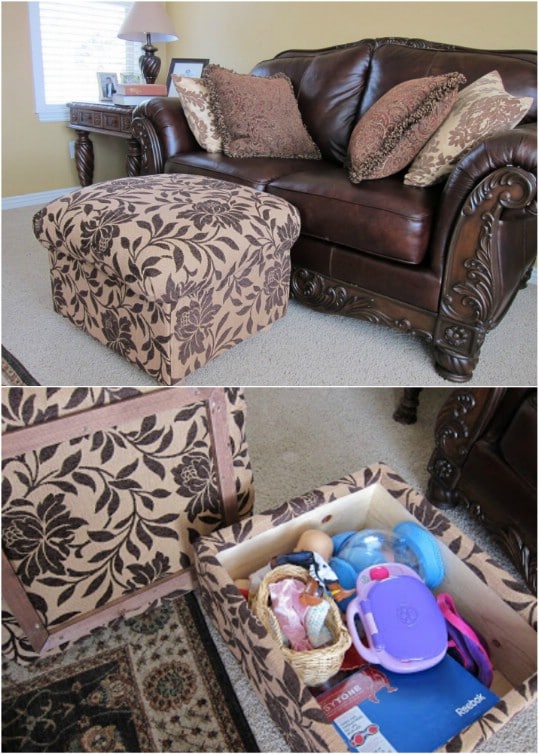
3. DIY Ottoman From Scratch

DIY Ottoman From Scratch
You can build this DIY ottoman completely from scratch and it's much easier than you may think. It also has storage inside so it's perfect for keeping magazines and other items organized. You build the actual ottoman from boards and then add a nice cushioned top that opens up to reveal the storage space inside.

Tutorial/Source: doityourselfdivas

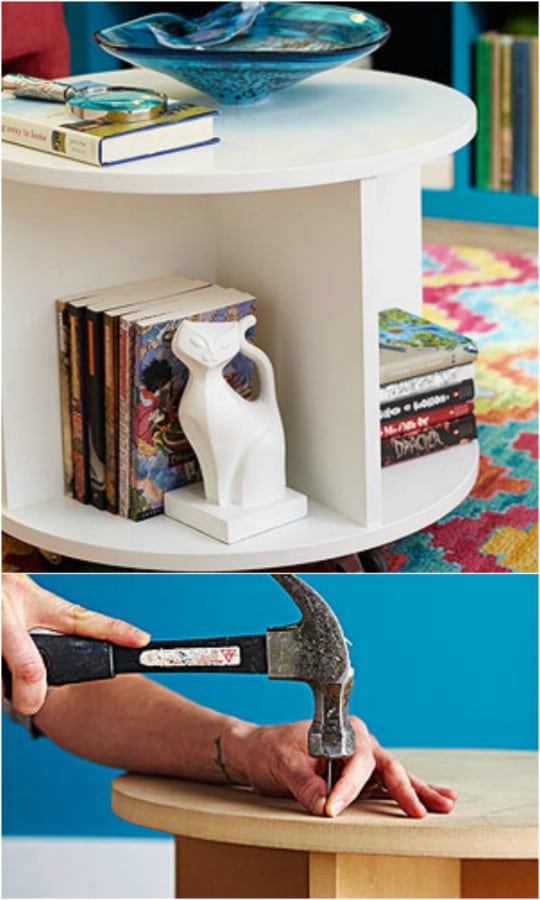
4. Circular Bookshelf Styled Ottoman

Circular Bookshelf Styled Ottoman
This circular ottoman has a bookshelf look and feel to it and offers loads of storage. It looks like an end table that you would pay a small fortune for at a furniture store but you can build this one completely yourself. It even has casters on the bottom so it's easy to roll around. You could totally do a couple more of these in larger sizes and have matching end tables, too!

Tutorial/Source: bhg.com

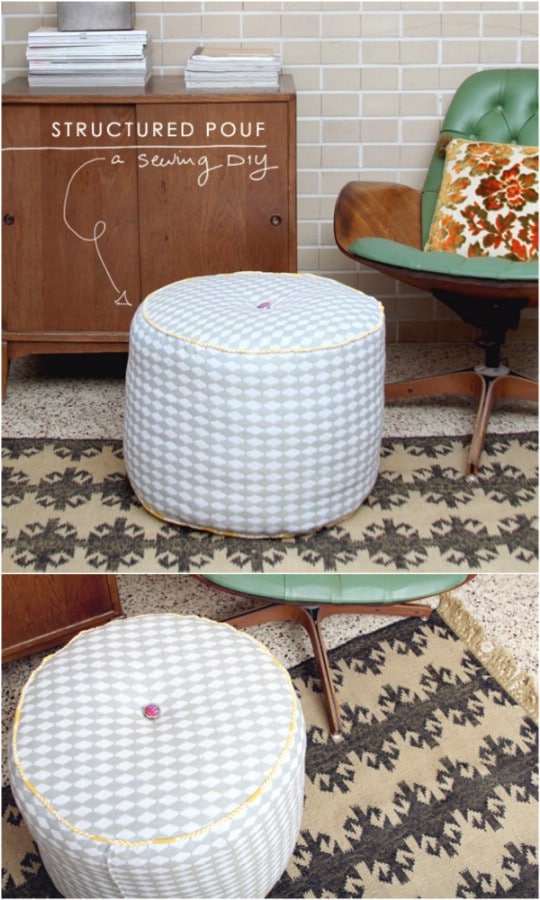
5. DIY Structured Poof Footstool

DIY Structured Poof Footstool
This ottoman really reminds me of the footstool that my grandparents used to have. It's made with three full sized comforters as well as yards of woven fabric and something large for a stencil. You can use a round end table or a really large bowl if you have it. The process isn't difficult at all and you will absolutely adore the end result.

Tutorial/Source: makingniceinthemidwest

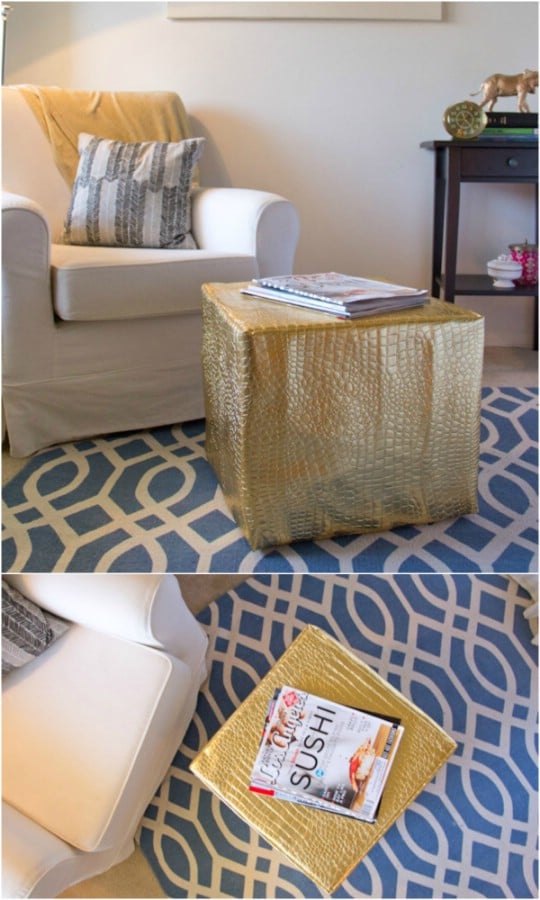
6. Beautiful And Contemporary Faux Leather Ottoman

Beautiful And Contemporary Faux Leather Ottoman
This gorgeous ottoman has a great modern look with its faux leather finish. It's also made with foam that you simply arrange and stack to create the shape that you want. Then, just cover it over with faux leather and sew it all together and you're all done. This is so easy and has such an elegant look.

Tutorial/Source: lovelyindeed

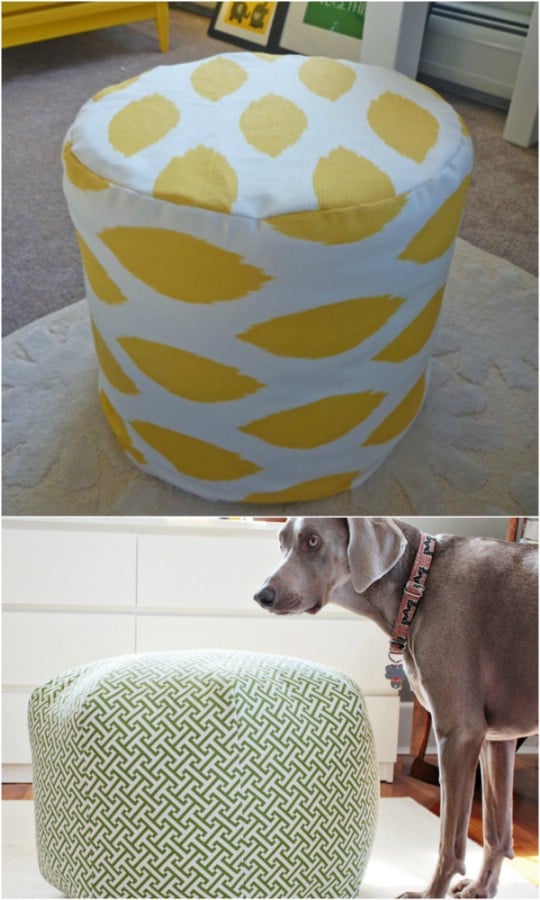
7. Easy $10 DIY Ottoman

Easy $10 DIY Ottoman
Yes, you can actually make this ottoman for around $10, and it's fabulous. This is basically round foam circles that are stacked on top of each other and then covered with fabric. You'll need to sew a bit for this one, but it's really easy sewing and you get this wonderful soft and comfy ottoman when you're finished.

Tutorial/Source: domesticadventure

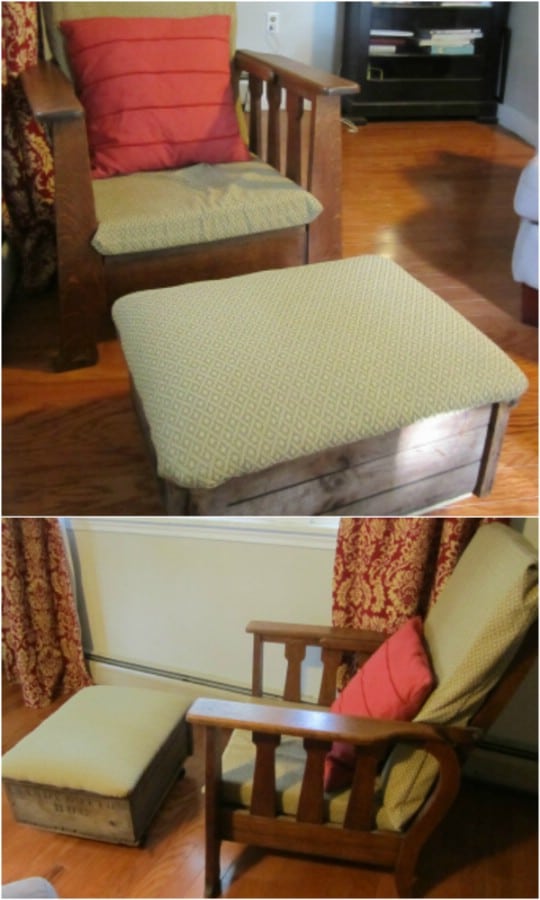
8. Repurposed Antique Crate Ottoman

Repurposed Antique Crate Ottoman
You can turn an old crate into a great ottoman that offers so much storage. Just clean the crate and then top it with something padded and you're all done. this is a great rustic look if you're looking to get that farmhouse charm in your home and would be perfect for sitting in front of an old rocking chair.

Tutorial/Source: rescueddesign

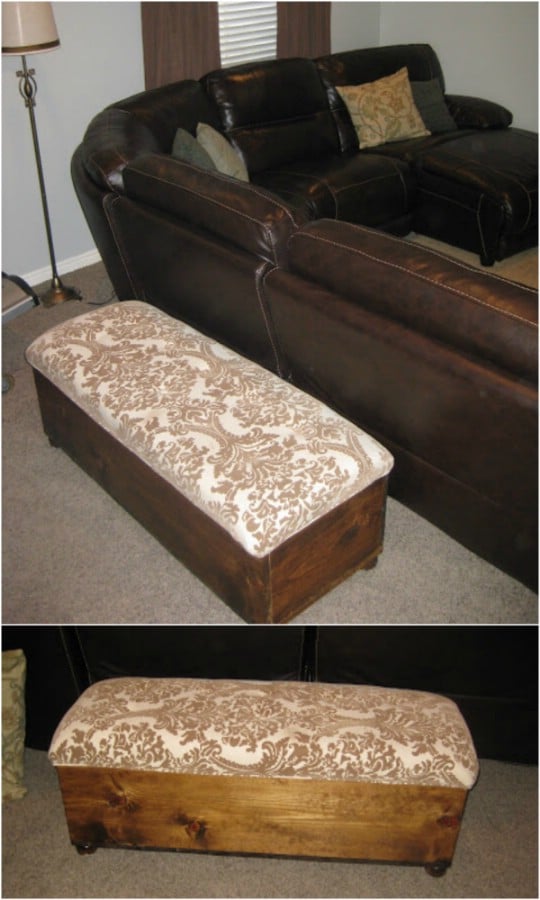
9. Long Bench Like Storage Ottoman

Long Bench Like Storage Ottoman
This storage ottoman is also built from scratch and it's really long, so it would be perfect in front of a couch or loveseat. It's made from boards that you may have on hand from other projects and topped off with a padded top so it's really comfortable. I love how long it is – it sort of resembles an old hope chest and gives you plenty of room to share.

Tutorial/Source: tdadecoratinganddesign

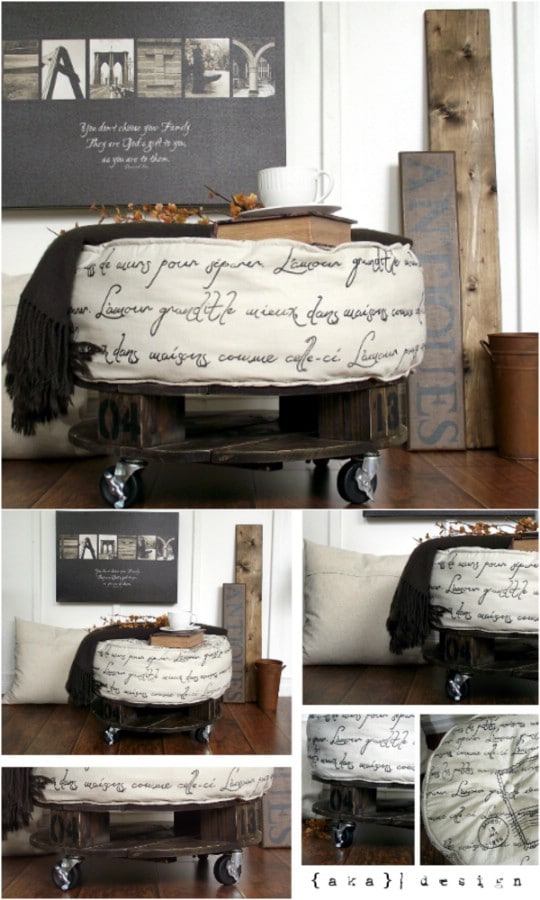
10. Easy DIY French Provincial Ottoman

Easy DIY French Provincial Ottoman
If French provincial is your style of choice, this ottoman will fit in perfectly with your furnishings and home décor. You begin with a round pallet, which you can totally make if you don't have one, and finish with a pouf that is decorative and really comfortable. Then add casters to make it easy to roll around.

Tutorial/Source: akadesign

20 Easy DIY Trellis Ideas To Add Charm and Functionality To Your Garden

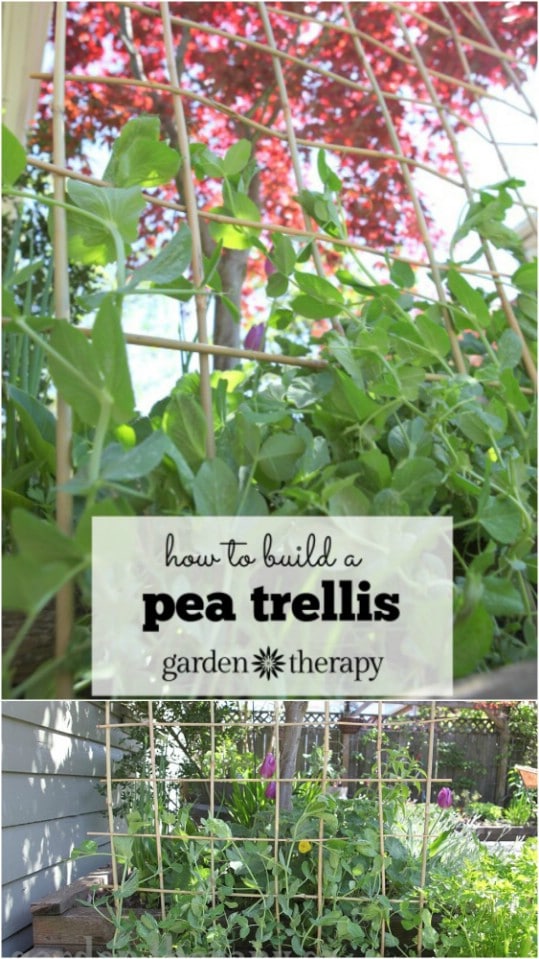
1. DIY Bamboo Pole Pea Trellis

DIY Bamboo Pole Pea Trellis
You can easily build a bamboo pole trellis that is strong enough to help those heavier plants as they grow. You'll need bamboo of course, and if you're in the south, wild bamboo grows just about everywhere so this one may not cost you anything. Just tie it all together with some twine. This is not only great for veggie gardens, but is a beautiful trellis to build in your flower garden as well.

Source/Tutorial: gardentherapy

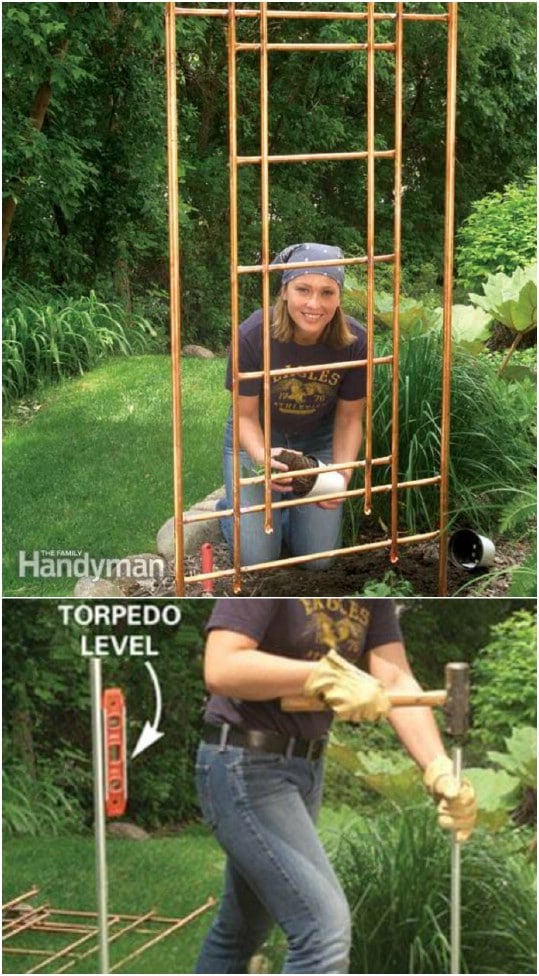
2. Elegant Copper Garden Trellis

Elegant Copper Garden Trellis
You can build a truly unique garden trellis with some copper pipe. This would be gorgeous in the flower garden and is perfect for allowing those vining plants to climb. There are so many different ways that you can design your own copper garden trellis and every single one will be long lasting and unique, sort of like your own little garden artwork.

Source/Tutorial: familyhandyman

3. Easy DIY Crib Rail Trellis

Easy DIY Crib Rail Trellis
You can easily build a trellis in the garden that really doesn't even require any building when you use an old crib rail. Take that old baby bed – which you may have on hand or you can find at a yard sale or thrift store – and take the rails off. Then just stand them up or hang them from a garden wall to create a beautiful trellis that requires very little work.

Source/Tutorial: trashbackwards

4. Freestanding Flower Trellis

Freestanding Flower Trellis
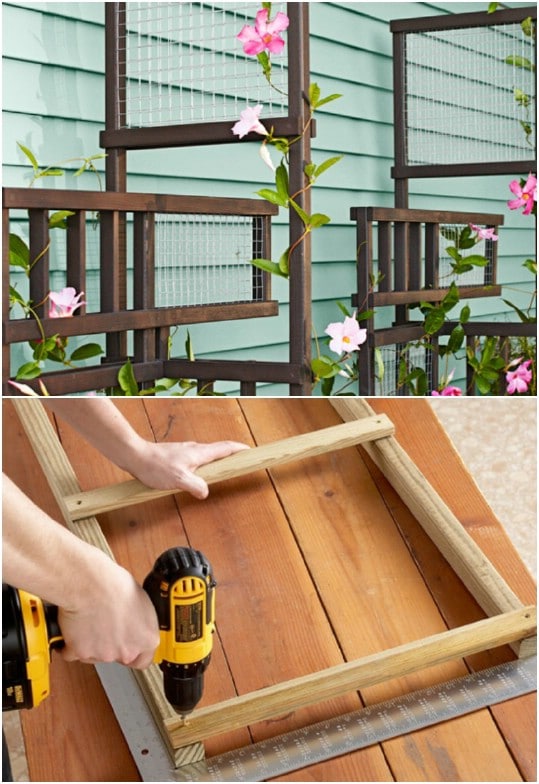
Treated lumber is perfect for building a trellis as it will withstand years of weather. You can use pretreated lumber to create a gorgeous flower trellis and it's not that difficult to build. I love that this one has dimension and isn't just a one sided trellis. It's perfect for adding character to the flower garden and is sure to become your favorite garden accessory.

Source/Tutorial: lowes

5. Scrap Board Vertical Container Garden Trellis

Scrap Board Vertical Container Garden Trellis
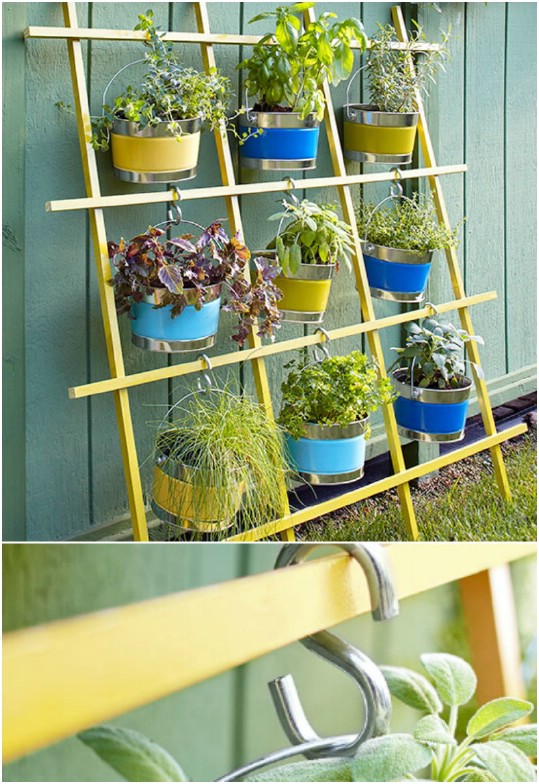
This trellis not only adds dimension so your flower garden, it doubles as a vertical garden so you can hang your container planters on it. It's a really easy build with scrap boards that you may have left over from other projects and when you paint it, it's a colorful addition to your flower garden that gives you loads of space to hang planters.

Source/Tutorial: bhg

6. Easy DIY A-Frame Trellis

Easy DIY A-Frame Trellis
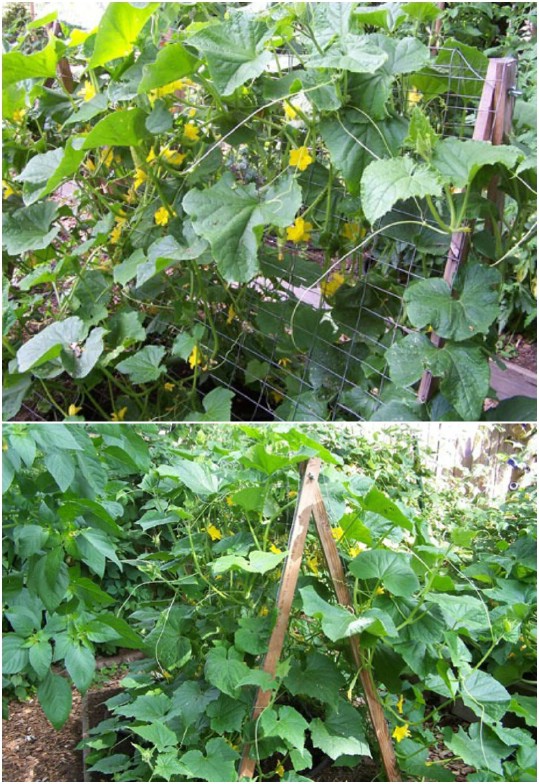
This easy to build a-frame trellis is perfect for your cucumbers or you could build it in your flower garden to help add character and give your vines a place to climb. You just nail your boards together in an A shape and then add wire to give vines a place to grab on. You can build one of these in about 15 minutes or less and it won't cost much depending on what you have on hand.

Source/Tutorial: apartmenttherapy

7. Living Garden Trellis

Living Garden Trellis
Some wire is about all you need to build this living garden trellis, which is absolutely stunning when your plants grow in. Just choose a pattern or design and make it with galvanized wire. You can hang it right on the outside wall of your home or a fence. Then, choose plants that will cover the trellis and watch as they transform that wire into a beautiful garden structure right before your eyes.

Source/Tutorial: onekingslane

8. Beautiful Arched Trellis

Beautiful Arched Trellis
This arch is great for growing squash, which tends to take over in the garden if you don't watch it carefully. You can also build this for your flower garden and use it to support your larger vines and plants. You'll need PVC pipe, some wire and glue and that's it. Just glue your PVC pipe together for each side and then weave it into wire fencing.

Source/Tutorial: getbusygardening

9. DIY Obelisk Garden Trellis

DIY Obelisk Garden Trellis
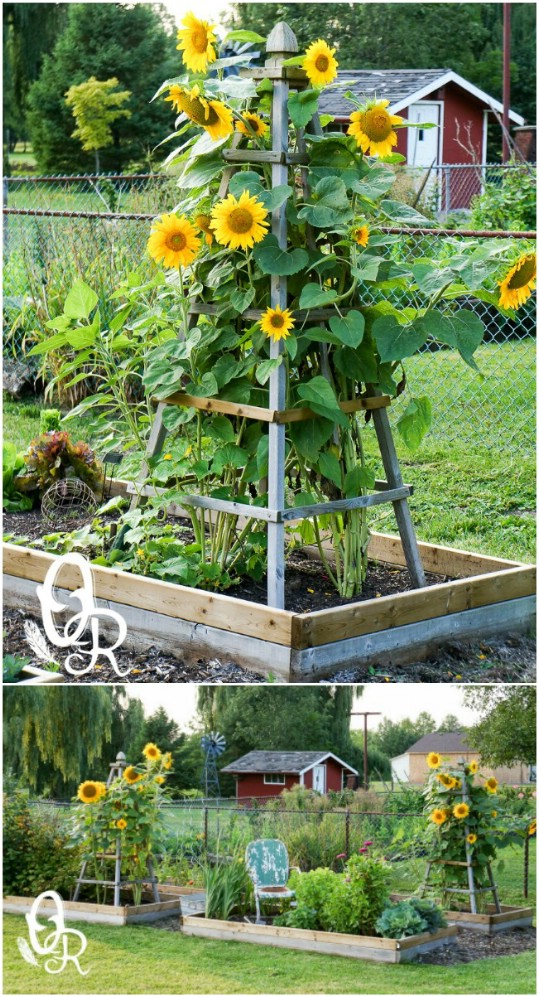
These standalone trellises are gorgeous and perfect for supporting those huge sunflowers. Imagine seeing these beauties in your garden just overflowing with gorgeous sunflowers! They're really easy to build, too and would be perfect for a number of vegetables if you don't really want or need them in the flower garden.

Source/Tutorial: oliverandrust

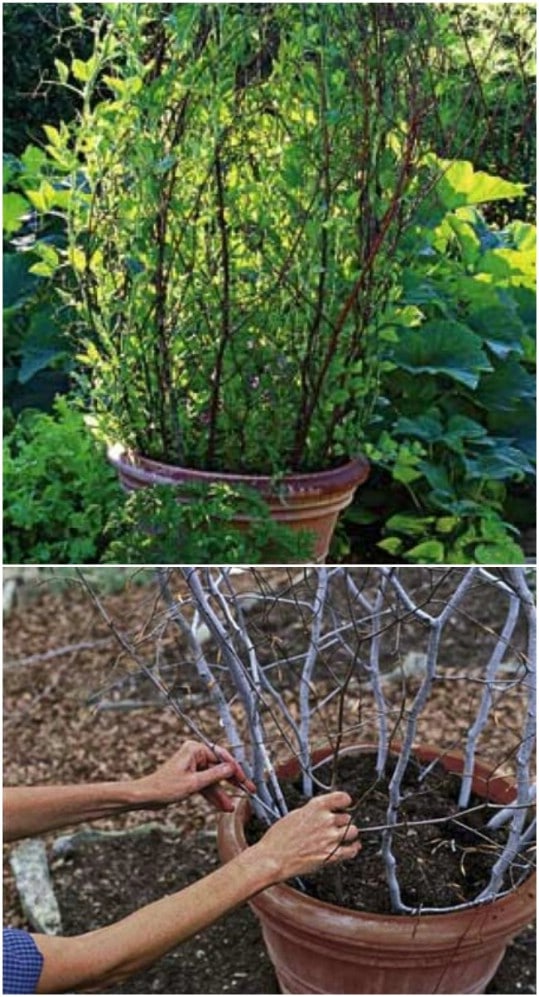
10. DIY Branch Trellis In A Pot

DIY Branch Trellis In A Pot
You can use twigs and branches to build a trellis and hold it all together in a planter. This is a wonderful way to keep your garden all natural and it certainly does have a rustic appeal to it, doesn't it? It's pretty easy to build and shouldn't take you long. Plus, the branches and twigs are free, so if you have a large pot, then this one won't cost you anything at all to build.

Source/Tutorial: thisoldhouse

20 Charming And Cheap Mini Water Garden Ideas For Your Home And Garden

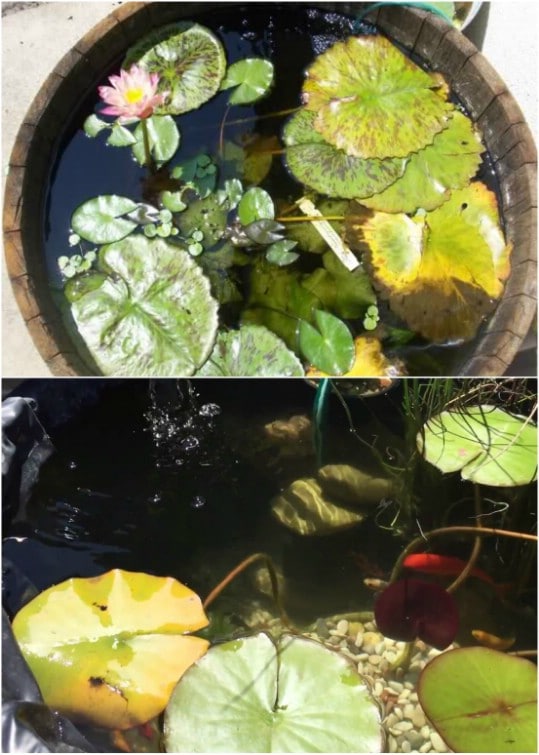
1. Wine Barrel Mini Pond

Wine Barrel Mini Pond
A wine barrel cut in half makes a gorgeous mini pond and gives your deck or garden area a lovely rustic look. You can find wine barrels at a lot of flea markets and thrift stores – or a winery if you have one close. Just cut it in half and then add your garden essentials to customize it.

Source/Tutotial: scapeclub

Goldfish pond tutorial:

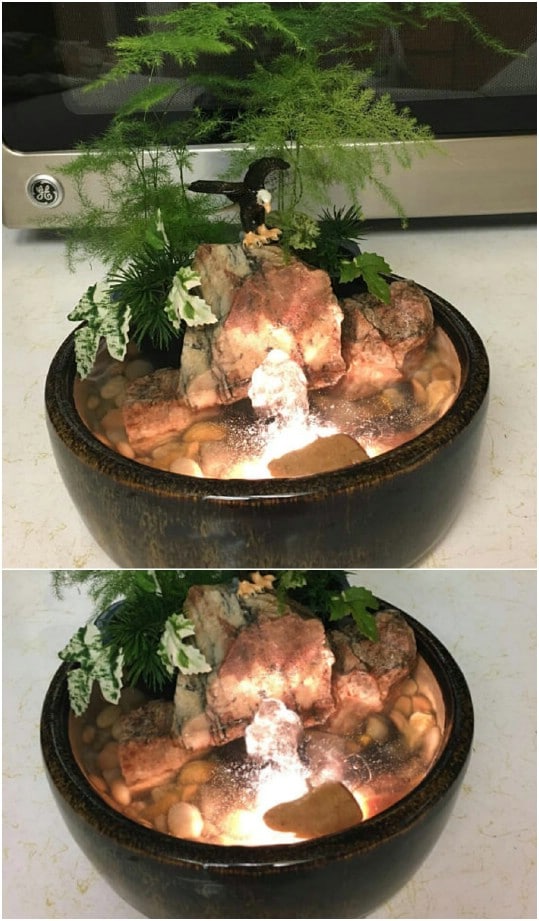
2. Tabletop Rock Mini Garden

Tabletop Rock Mini Garden
This tabletop water garden is made from a ceramic bowl and has lovely rocks to give it dimension and character. You can easily set one of these up, with or without the mini fountain, and just add your favorite water plants to give it greenery. You can find this one on Etsy for under $50 if you don't feel like making one yourself.

Source/Tutotial: etsy.com

3. Stock Tank Mini Yard Pond

Stock Tank Mini Yard Pond
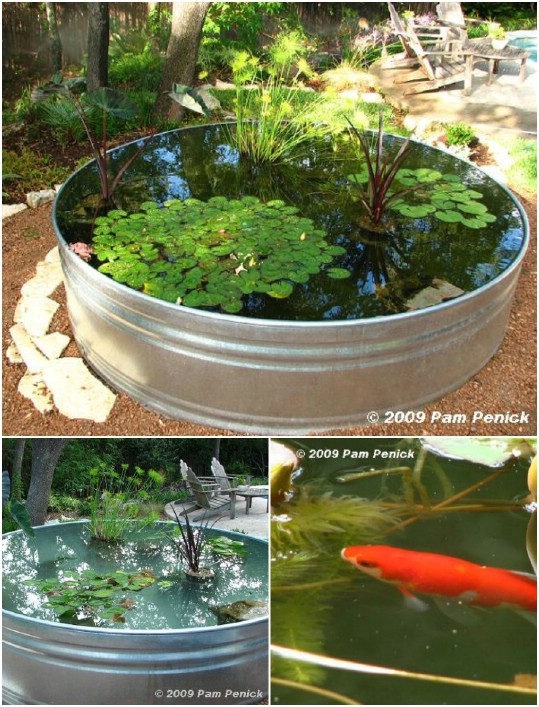
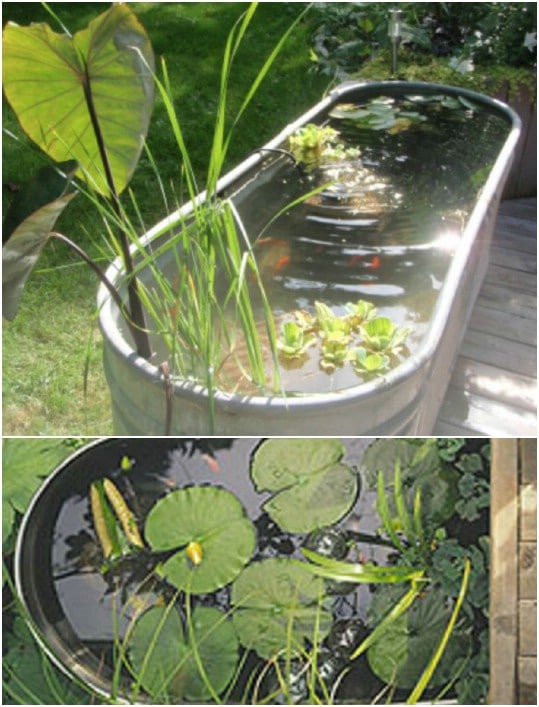
If you have the space and want to go a bit bigger with your water garden, you can use a stock tank to create a raised yard pond. I love the idea of just setting up a tank and then adding water and plants, and you could even paint the tank if you're so inclined. You can pick these tanks up at any tractor or livestock supply store.

Source/Tutotial: penick.net

4. Galvanized Bathtub Mini Pond

Galvanized Bathtub Mini Pond
An old metal bathtub, kitchen sink, or just about any similar structure would be perfect for creating your little mini water garden. Just set it up and then add your water and whatever flora you want to include. Add stones or glass items to add character and even a little fish or two if you want.

Source/Tutotial: bhg.com

5. Galvanized Metal Bucket Water Garden

Galvanized Metal Bucket Water Garden
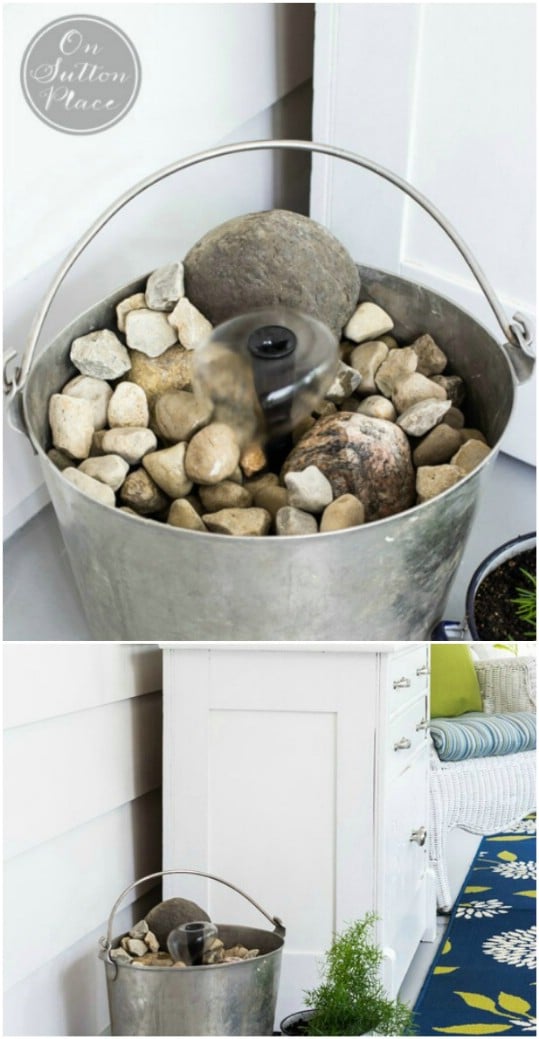
Turn an old metal bucket, which you can pick up at any flea market or yard sale for really cheap, into a beautiful and very rustic mini water garden. Just add a small water fountain kit and then fill the bucket with rocks. You'll hear the wonderfully relaxing sound of trickling water whenever you're near the bucket and this is a good one to do if you don't really want to add plants.

Source/Tutotial: onsuttonplace.com

6. DIY Clay Pot Water Garden With Fountain

DIY Clay Pot Water Garden With Fountain
Clay pots are also a wonderful way to add water features to your property. And, they're pretty cheap at the Dollar Store. Just grab a few in different sizes and set them, adding a fountain to the mix. You can add plants to the pots that aren't upside down and fill the bottom with river rocks or glass stones. This is a great one for the deck or if you choose smaller planters, you could even put this one inside.

Source/Tutotial: diyncrafts.com

7. Easy DIY Container Garden

Easy DIY Container Garden
So, container water gardens are the easiest way to add a water feature without going all out yard pond. You can even use plastic containers, which you can get at Big Lots or the Dollar Store for under $20 in most cases. Then you just need to add your plants and even a few small fish if you want them. You can build this gorgeous outdoor mini water garden for less than $40 total.
Source/Tutotial: whatsurhomestory

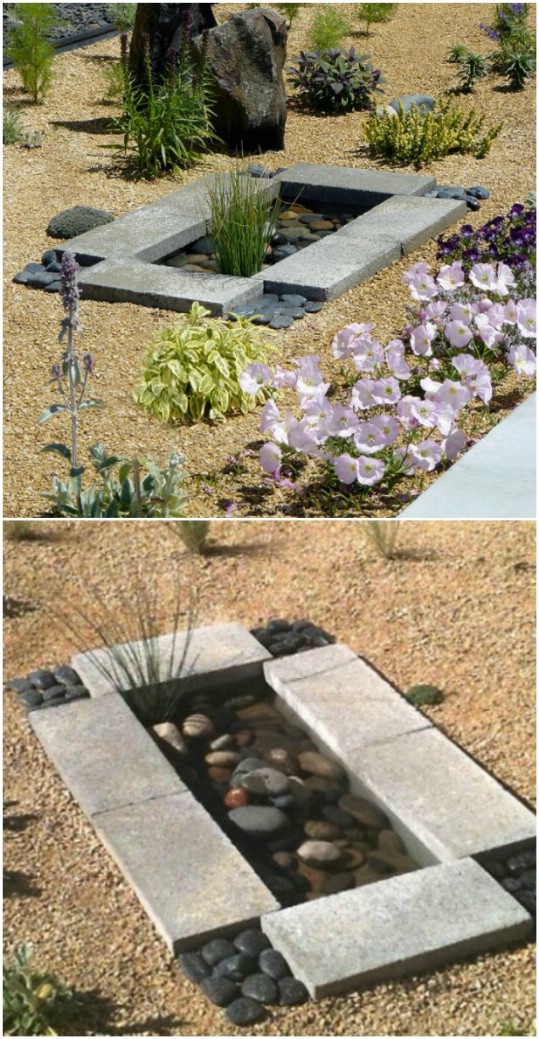
8. Contemporary DIY Water Garden

Contemporary DIY Water Garden
I love the contemporary look of this little mini water garden and you can build it for less than $30. You'll need a watertight container, a fountain pump, some concrete pavers for the edging, rocks and your water plants. Just dig a hole big enough for your container to sit in and then work it like a regular pond. It's a gorgeous little mini pond that will definitely add character to your garden area.

Source/Tutotial: thegardenglove

9. Hypertufa Fountain Mini Water Feature

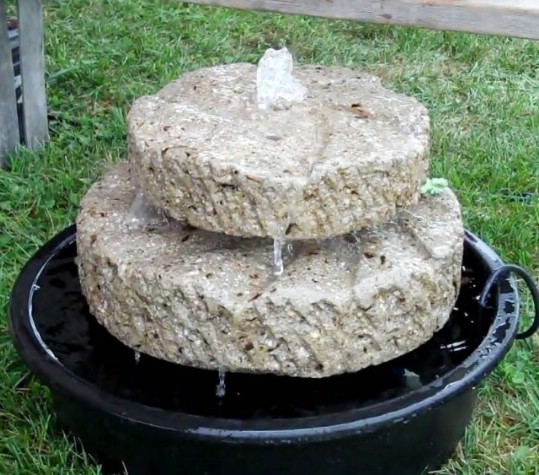
Hypertufa Fountain Mini Water Feature
I love this hypertufa stacked millstone fountain. It would be so perfect for the garden area and you can pick it up on Etsy for less than $200. It's made with Portland cement, peat moss, perlite, hypertufa and concrete. The fountain is perfect if you want that running water sound and you could decorate it with plants around the base if you wanted.

Source/Tutotial: etsy

10. Easy DIY Mini Pond Box

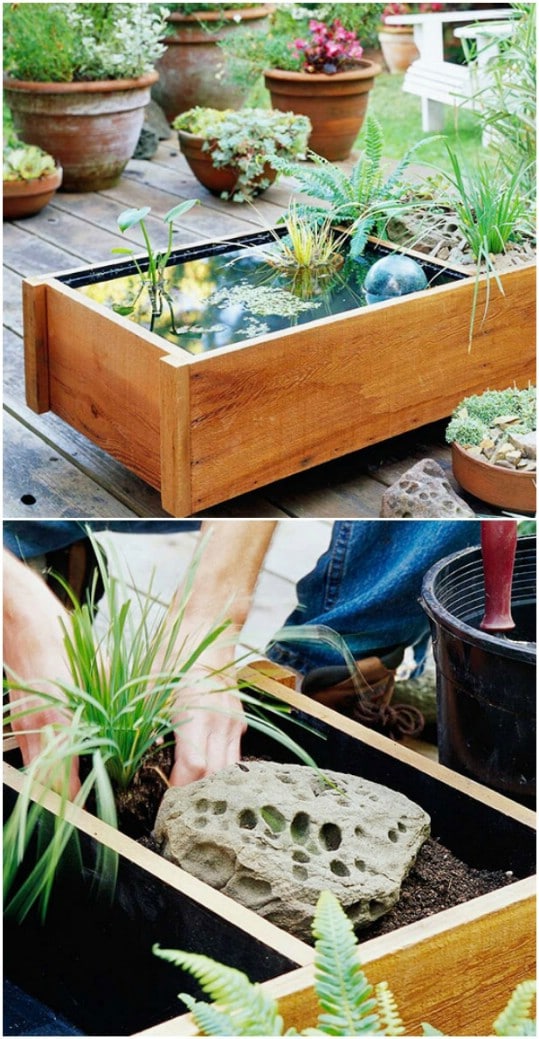
Easy DIY Mini Pond Box
If you don't have a structure to use for your mini water garden, just make one yourself. This box is really pretty and really easy to build. It's made from cedar and the entire look is just so gorgeous. With a section for rocks and plenty of room for your water plants, this is sure to be the perfect mini water garden for your deck or patio.

Source/Tutotial: bhg

30 Brilliant Repurposing Ideas For Old Scarves That You Can Make For Almost Free

1. Anthropologie Inspired Scarf Flats

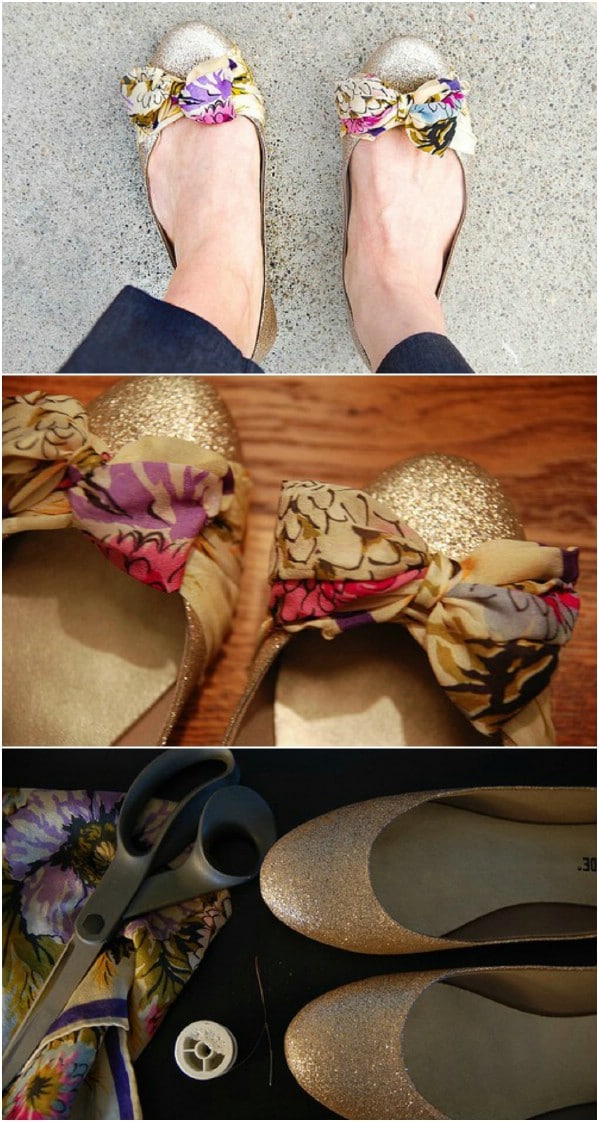
Anthropologie Inspired Scarf Flats
You can take those old scarves and use them to make these beautiful shoes that are inspired by Anthropologies' silk scarf flats. These flats at Anthropologie are nearly $150, but you can make them for about $5. Buy a pair of sparkly flats at the Dollar Store – for $5 or so – and then add your own silk bows from your old scarves. You've got great shoes and you've saved over $100.

Tutorial/Source: starsforstreetlights

2. No Sew DIY Café Apron

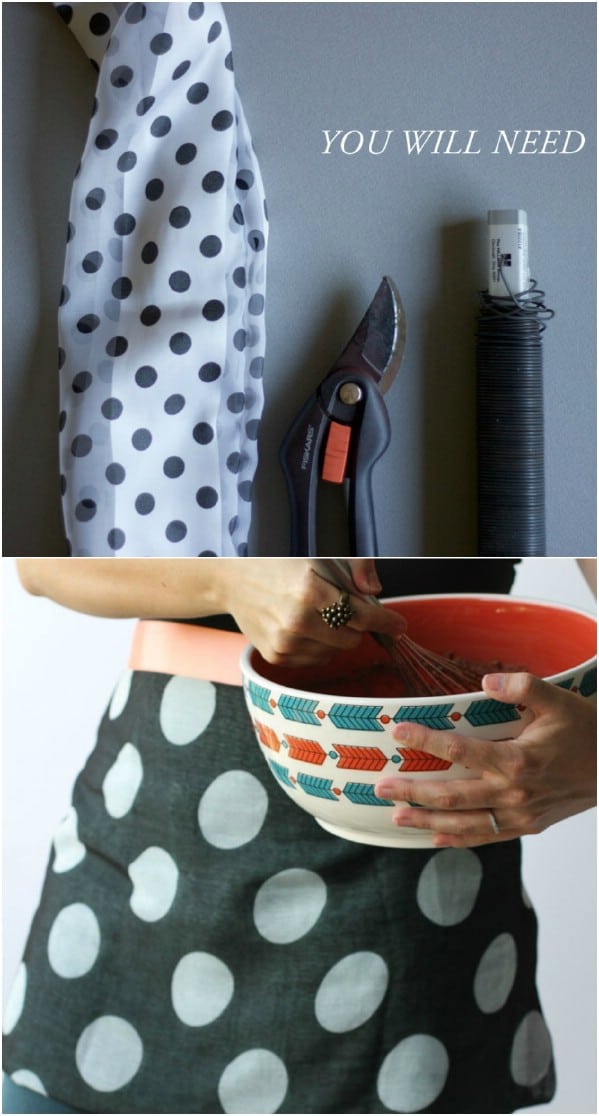
No Sew DIY Café Apron
You can turn those scarves into wonderful aprons and the best part is, there's no sewing required. You iron in some fusible webbing and iron on a ribbon to tie the apron on. That's it. You could make several of these depending on how many scarves you have available and they would make excellent gifts for Mother's Day, bridal showers, and other special occasions.

Tutorial/Source: scarves

3. Repurposed Scarf Fabric Bunting

Repurposed Scarf Fabric Bunting
Tie a few old scarves together and you have wonderful bunting to decorate just about anything. Use this to decorate a baby's nursery or for special dinners or other party like celebrations. You don't need anything aside from a handful of scarves. You just tie them together and that's it.

Tutorial/Source: lily.fi

4. 10 Minute DIY Scarf Tunic

10 Minute DIY Scarf Tunic
You can turn a couple of silk scarves into a beautiful tunic in about 10 minutes or less. You can coordinate your scarves or mix and match to make something really unique. You'll get a beautiful tunic that is very 1970's inspired and it's an easy and really cheap way to add some exciting clothing to your wardrobe.

Tutorial/Source: lostinparis

5. DIY Upcycled Scarf Jewelry Tray

DIY Upcycled Scarf Jewelry Tray
Use those scarves to decorate a beautiful jewelry tray! You need some Mod Podge – you know how I love working with Mod Podge – and a few old scarves to make this, as well as a wooden tray. You just Mod Podge the scarves over the wood and you've got a beautiful jewelry tray that looks like it came from a high end department store.

Tutorial/Source: helloglow

6. Repurposed Scarf Framed Art

Repurposed Scarf Framed Art
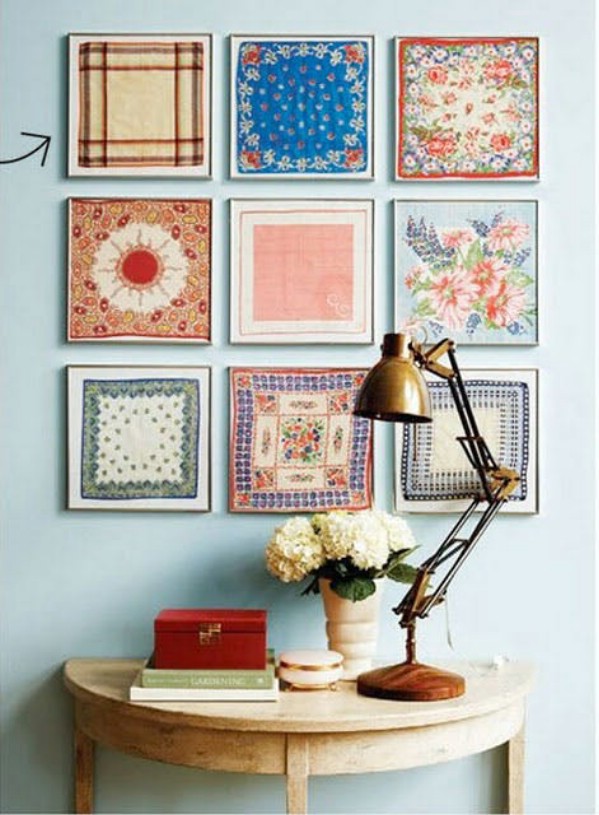
If you just don't have time for a lengthy DIY project and you still want to do something with all of those old scarves, why not just frame them and use them for home décor? A silk scarf in a frame is gorgeous and depending on how many you have on hand, you could create an entire gallery wall of art. Use different colors and designs to get a really nice quilt look on the wall.

Tutorial/Source: apartmenttherapy

7. Five Minute Twist Bracelet

Five Minute Twist Bracelet
You can create this great bracelet in about five minutes or less. These make wonderful gifts for teens and adults alike and are so very easy to create. You don't even need the entire scarf so depending on how big it is, you could get several twisted bracelets from it. You just need wooden beads to add to the end to keep them from unraveling.

Tutorial/Source: hellonatural

8. Repurposed Vintage Scarf Shirt

Repurposed Vintage Scarf Shirt
Turn an old scarf into a gorgeous new shirt in just a jiffy. You'll actually need a couple of scarves for this and the result is a stunning shirt that is very feminine and very easy to make. Those silk scarves will be much better served when you pair them with jeans as this lovely shirt!

Tutorial/Source: recycled-fashion

9. Silk Scarf Turned Jacket

Silk Scarf Turned Jacket
You can also turn a larger silk scarf into a beautiful silk jacket that is perfect for spring. It's not too heavy so it won't be too hot and it's absolutely perfect to pair with jeans or even those fancier work clothes. You don't even have to cut and sew for this. You literally just tie up two corners to create arm slots and you're all done.

Tutorial/Source: kendieveryday

10. DIY Repurposed Scarf Holiday Wreath

DIY Repurposed Scarf Holiday Wreath
It's not close to Christmas but that doesn't mean we can't add some holiday DIY projects to our schedules. If you are working with old scarves and wondering what you can repurpose them into, consider this lovely Christmas wreath. This is made with an old wool scarf, although you could follow the method and create it with any scarf you have on hand. Use lighter and more pastel colors to make a spring wreath, too.

Tutorial/Source: onefabday

11. Upcycled Scarf Baby Bib

Upcycled Scarf Baby Bib
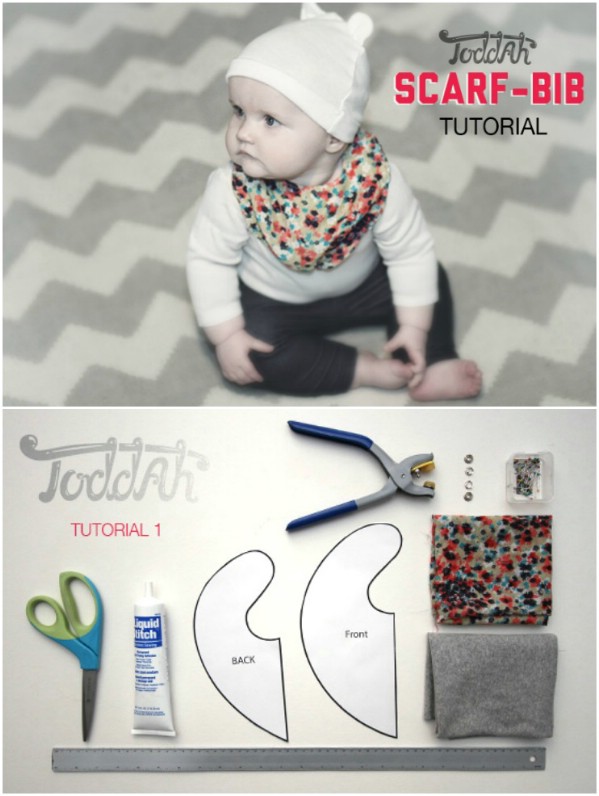
Who says your little ones can't be fashionable? If you have an old scarf that you're not going to wear anymore, you can turn it into an adorable and very fashionable scarf bib for baby. This is an excellent idea for upcoming baby showers. You can create bibs that are so unique, and look so high dollar. Plus, you can get more than one bib from larger scarves and they're really comfortable for baby.

Tutorial/Source: toddah

12. Cute DIY Scarf Strappy Sandals

Cute DIY Scarf Strappy Sandals
We all love wearing our flip flops and sandals in warmer weather, don't we? Of course, those things aren't cheap and buying new shoes every season can get expensive. Instead, turn those old silk scarves into beautiful sandals. You can save money and be stylish at the same time. This is an easy project that only takes about 15 minutes and you only need an old scarf and a pair of flip flops.

Tutorial/Source: sheknows

13. Repurposed Scarf Sun Catchers

Repurposed Scarf Sun Catchers
I love these vintage scarves turned sun catchers. I love sun catchers anyway, but these are really gorgeous and they're so unique. You make them with silk scarves and embroidery hoops. This is such an easy project and one that you can do in just a few minutes.

Tutorial/Source: sadieseasongoods

14. DIY Curtains From Old Scarves

DIY Curtains From Old Scarves
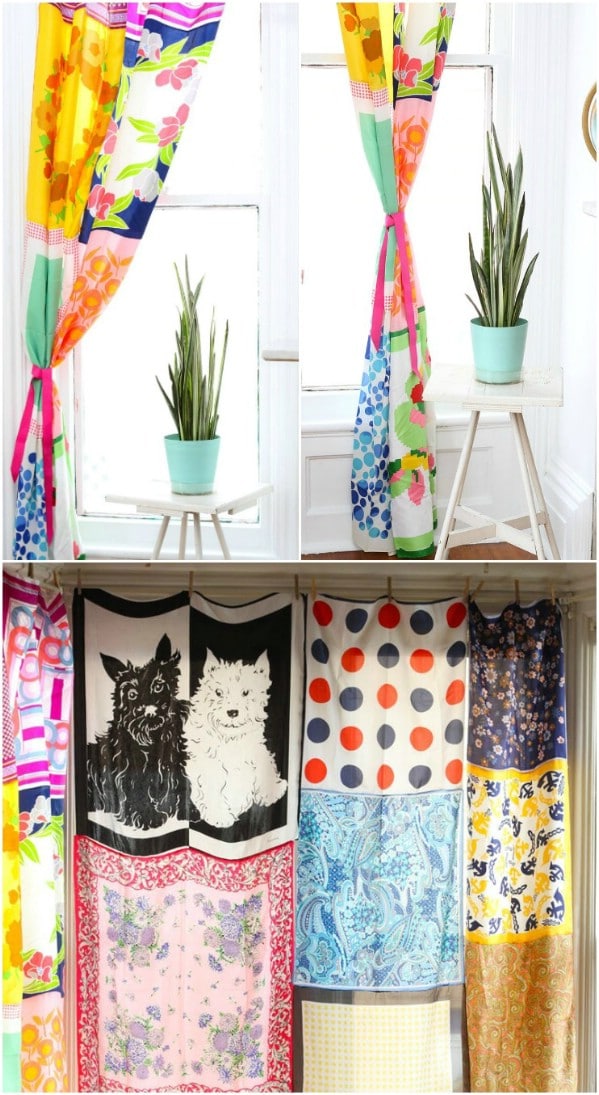
Turn those old scarves into unique and beautiful curtains. I love the idea of creating a fabric shower curtain from old silk scarves or if you have a room with a smaller window you could create an actual curtain. By all means, make curtains for your larger windows, too if you have enough scarves to fit. You do it like a patchwork design, just joining the scarves all together and then folding over to add the curtain hooks.

Tutorial/Source: apartmenttherapy

15. DIY Scarf Bubble Necklace

DIY Scarf Bubble Necklace
This necklace is really fashionable and easily made with an old silk scarf and a few other materials. You wrap the scarf around Styrofoam balls and then secure and separate each section with a decorative ring of some sort. I love the entire look of this and you could do several in different colors and designs. They would also make wonderful gifts.

Tutorial/Source: scarves

30 Creative And Crafty Ways To Repurpose Old Bed Sheets

1. DIY Repurposed Sheet Crib Mobile

DIY Repurposed Sheet Crib Mobile
If you have a baby on the way, or know someone who does, you can repurpose those old colorful sheets into this amazing crib mobile. The mobile hangs from an embroidery hoop and while it does require a bit of sewing, the end result is gorgeous and so colorful – depending of course on what sheets you are using. This would be a great idea for old crib sheets too – you could make your mobile character themed!

Source/Tutorial: sewshesews

2. Easy Braided Dog Toy

Easy Braided Dog Toy
You can easily turn an old sheet into this fun braided dog toy, which your little pooch will love. You just cut the sheet into strips and then braid several strips together at once. This is much easier than it sounds and you end up with a wonderful toy that is strong enough for your doggie to chew on and pull without tearing it up. If you have more than one dog, use a couple of sheets and make them all a handmade dog toy!

Source/Tutorial: instructables

3. Repurposed Sheet Pajama Pants

Repurposed Sheet Pajama Pants
Turn those old sheets – especially the great print ones – into these amazingly simple to create pajama pants. When you don't really feel like getting out of bed, you can literally take the bed with you. Sheets are so comfortable and lightweight, which is what makes them perfect for creating these great pajama pants. You don't really even need a pattern – although you could use one if you wanted. These are really easy to make and are perfect for the entire family.

Source/Tutorial: duckyhouse

4. Easy DIY Curtains

Easy DIY Curtains
You can turn a couple of twin sheets into beautiful curtains with just a few additional supplies and about an hour or so of time. If you just can't find the curtains that you want to match your bedding, but you have sheets in the right color, turn those sheets into the curtains that you need. This is also an excellent way to get some great themed curtains for kids' rooms from old sheets that have designs or characters that may not be available any longer.

Source/Tutorial: designertrapped

5. DIY Repurposed Sheet Teepee

DIY Repurposed Sheet Teepee
This easy to DIY teepee will be the highpoint of your kids' rooms. You can use it to give them their own space for creating or reading or just build it in the toy room for when they play together. It's a really easy project and won't cost much at all if you have a few key supplies on hand, including that old sheet.

Source/Tutorial: placeofmytaste

6. Repurposed Sheet Chunky Headband

Repurposed Sheet Chunky Headband
I love this headband – not only is it chunky, which is my favorite type of headband, it's decorated with an old sheet. You can do this by simply cutting your sheet fabric and using fabric glue to hold it over a large headband. This is such a unique look and if you don't really want to DIY the look, you can get this one on Etsy. The scraps are sewn on to make them really sturdy.

Source/Tutorial: etsy.com

7. Creative Fabric Gift Wrap

Creative Fabric Gift Wrap
You can use up old sheets and give your gifts a little extra touch when you use that fabric for gift wrap. This is a great way to give all of your gifts a little country touch, too. You can either cut scraps from your sheets and give gifts a quilted look with different designs or wrap them in a larger piece of fabric and tie off with a burlap bow or ribbon. There are so many ways that you can incorporate old sheets into your gift giving!

Source/Tutorial: sustainablebabysteps

8. Repurposed Sheets Into Fabric Covered Hangers

Repurposed Sheets Into Fabric Covered Hangers
You know those old metal hangers – the ones that get rusty after a bit and tend to warp and bend? Did you know that you can cover those hangers in fabric? Not only is this a great way to put those old sheets to use, it's also a wonderful way to protect your clothing from rust and to keep your hangers functional for a much longer period of time. Just cut your sheets into strips and then wrap those strips around your hangers.

Source/Tutorial: corrieberrypie

9. DIY Fabric Wrapped Bangles

DIY Fabric Wrapped Bangles
Those colorful and floral designed old sheets would make the most beautiful bracelets, don't you think? You can turn those sheets into the most wonderful bangles and this is a quick and easy project – and one that would make a wonderful gift for someone special. Just take those plastic bangles that you can get from the Dollar Store (for less than a dollar each in most cases) and cover them with strips that you cut from your sheets. Glue them in place with fabric glue and you're making your very own fashion statement.

Source/Tutorial: sadieseasongoods

10. Simple And Quick DIY Laundry Bag

Simple And Quick DIY Laundry Bag
Laundry is definitely not my favorite household chore. It's not even second on the list, but it is something that needs to be done – daily in my house. I really love this DIY laundry bag, that would make doing laundry so much easier. You can make one of these for every bedroom in the house – from an old sheet – and then just carry that bag to the laundry room as you do laundry from each bedroom. It can hang on the back of the door so it's out of the way, too.
Source/Tutorial: momtastic

11. Rustic Quilt From Repurposed Sheets

Rustic Quilt From Repurposed Sheets
If you love to quilt – or even if you've never done it before – you can turn those old sheets into a beautiful rustic quilt. Just cut the sheets into squares and mix and match all you want to make your own design. This is why I love quilting. No design is wrong and you can make each quilt unique. If you have an upcoming wedding or baby shower, a quilt is a wonderful gift and you can use those old sheets to make it!
12. Repurposed Sheet Spring Dress

Repurposed Sheet Spring Dress
Turn a lovely floral or otherwise light colored sheet into a cool and sleek dress that is perfect for spring. Take your favorite spring dress pattern and then just use an old sheet for the material. If you already have a pattern and you already have a sheet to use, you can make your own gorgeous little dress for spring and it won't cost you a penny. Plus, the lightweight material of the sheet is perfect for warmer weather.

Source/Tutorial: trevorlovesmommy

13. DIY Embroidery Hoop Wall Art

DIY Embroidery Hoop Wall Art
Those old sheets combined with a few embroidery hoops and some imagination will give you stunning décor for any bedroom. I love this idea for the nursery. You just put pieces of your sheets inside the embroidery hoops to display them. It's perfect if you have some themed or character based sheets or you can actually embroidery names or anything else on the sheets – they're in the hoop after all.

Source/Tutorial: projectnursery

14. Fun Outdoor DIY Tents

Fun Outdoor DIY Tents
Summer is nearly here and that means kids outside playing – which we parents generally love, right? You do however, have to make sure that your little ones are safe from sunburn, which is where these fun DIY tents made from sheets can come in. Not only will they keep the sun away, they're super fun for kids to play in. You use a plastic hula hoop, which you can get from the Dollar Store for under $5, and then just drape a sheet across it. It's so easy to make and kids will have hours of fun playing in their little hideaways.

Source/Tutorial: alannageorge

15. Updated Dresser From Repurposed Sheets

Updated Dresser From Repurposed Sheets
I love the look of this little dresser. If you've got a dresser to redo, or you just want something really different for a nursery or kid's room, using those old sheets to redo the dresser is a wonderful idea. Just cut the sheets into large strips to fit the front of your drawers and then use glue and Mod Podge to hold everything together. This is a great look for a baby's room or anywhere that you want to add a little uniqueness.

Source/Tutorial: underconstructionblog

40 Relaxing Wind Chime Ideas To Fill Your Outdoors With Beautiful Sounds

1. Vintage Metal Teapot Wind Chime

Vintage Metal Teapot Wind Chime
You can turn an old metal teapot – or coffee pot for that matter – into a gorgeous wind chime that sounds amazing when the wind blows. The chimes on this one are old spoons and other silver cutlery which has a beautiful sound when it clinks against the teapot. Tie your chimes to the teapot with hemp, twine or regular rope and sit back and listen to the wonderful sounds it makes.

Tutorial/Source: butter-nugget

2. DIY Bottle Cap Wind Chime

DIY Bottle Cap Wind Chime
You can save bottle caps from drinks or buy them at most craft stores. When you have a few, turn them into a gorgeous wind chime. I've seen this done in many ways and all of them are great. If you want a more vintage look, leave your bottle caps as they are. If you prefer something more modern and colorful, you can spray paint each one. Then just string them all up together and add any decorative properties that you want.

Tutorial/Source: frogsandsnailsandpuppydogtail

3. Chain Heart Valentine Wind Chime

Chain Heart Valentine Wind Chime
This heart made of chains is not only rustically beautiful; it also gives off a wonderful sound when the wind hits it. You make it with an old chain, some metal for the base and a wooden post to show it off. This is a really easy project to do, and it's a unique take on the traditional wind chime. You could do this in any number of shapes to make it more unique.

Tutorial/Source: instructables

4. Easy DIY Colorful Wind Chime

Easy DIY Colorful Wind Chime
This beautifully colored wind chime is made with an inverted terra cotta planter and the chimes are made from colorful glass shells. You can find these at most hobby or craft stores. The shells are tied together with invisible cord or you could even use fishing line if you already have some on hand. This entire project costs less than $20 and that's if you have to buy everything.

Tutorial/Source: myhomemystyle

5. Handmade Sun Catcher Wind Chime

Handmade Sun Catcher Wind Chime
Sun catchers are gorgeous, especially when they're combined with a wind chime so you get beautiful colors and sounds. You can completely make this one yourself from melted plastic and beads. You melt the plastic yourself, which you should do outdoors if at all possible so that you're not smelling that horrid melted plastic smell. When it's finished, this is a gorgeous sun catcher that is filled with color.

Tutorial/Source: stayathomelife

6. Natural Wood Chime

Natural Wood Chime
You can make this natural wind chime from a branch or piece of driftwood. The chimes are organic clay shapes, which you can pick up at any hobby or craft store, or make them yourself. This one offers a beautiful melody and would be perfect to hang in the garden or on the back deck, wherever you want to add some natural beauty.

Tutorial/Source: gardentherapy

7. Beautiful DIY Driftwood Wind Chime

Beautiful DIY Driftwood Wind Chime
This beautiful chime is made from all driftwood, so the sound you get is more of a deeper clank than a metal bell sound. It's a pretty easy project, too. You'll need driftwood and then a drill to make holes. You just string the driftwood together with rope or twine and then hang it on the porch for a lovely natural sound.

Tutorial/Source: goinghometoroost

8. Upcycled Stained Glass Sun Catcher Wind Chime

Upcycled Stained Glass Sun Catcher Wind Chime
This stained glass sun catcher and wind chime is gorgeous and it gives off a lovely sound. It's made with stained glass squares that are tied together with beaded cord and they hang from a wine bottle. I found this one on Etsy for around $60 and it's made from an upcycled wine bottle and has more than 26 pieces of stained glass overall.

Tutorial/Source: etsy.com

9. Rustic DIY Flatware Wind Chime

Rustic DIY Flatware Wind Chime
You can create a beautifully sounding wind chime and upcycle that old flatware at the same time. If you have some old silver spoons and forks that you aren't using any longer, you can turn them into this lovely wind chime with some fishing line and a few other key supplies. This one is as rustic as it is lovely and is perfect if you're looking to add a farmhouse quality to your outdoors.

Tutorial/Source: whimsy-love

10. Glass Cube Wind Chime

Glass Cube Wind Chime
Glass tiles give this wind chime a lovely sound when the breeze hits it. This is a really easy one to make and for the base, you can just use a small branch or piece of driftwood. You just drill a hole into the glass tiles, just large enough to fit the line through and then hang. You have a lot of creativity with this one too, depending on the actual tiles and colors that you buy.

Tutorial/Source: newhousenewhomenewlife

11. Vintage Treasures Wind Chime

Vintage Treasures Wind Chime
This is a wonderful way to preserve some memories and create something new at the same time. This vintage treasures wind chime is made with old keys, jewelry and other items that all fit together perfectly. Just look around and see what you have on hand that might make a wonderful sound when in the breeze and put it all together to see what you can create.

Tutorial/Source: rebeccasower

12. Rustic Mason Jar Lid Chime

Rustic Mason Jar Lid Chime
Turn those old mason jar lids into a beautiful wind chime this summer. This is an excellent craft for the kiddos when they get bored over the summer. Just paint the lids from your old canning projects and drill a hole big enough to fit some twine through. Then just string them all up and attach to a base of some sort. An embroidery hoop works perfectly for the base.

Tutorial/Source: craftingagreenworld

13. Vintage Mason Jar Wind Chime

Vintage Mason Jar Wind Chime
An old mason jar can be cut in half to make a lovely vintage wind chime. This is the perfect chime if you're looking for that country look and it's really elegant with beads and other pieces flowing down from it. The jar works as the base and glass beads and old costume jewelry can be used to make the chimes.

Tutorial/Source: savedbylovecreations

14. Melted Bead Heart Wind Chime

Melted Bead Heart Wind Chime
This lovely heart wind chime is made from melted beads. You can put the beads in a silicon mold and then bake them to create your shapes. This is an excellent project for little ones. They can help to fill up the molds and even choose the colors that they want to use to make their wind chime.

Tutorial/Source: notimeforflashcards

15. Upcycled Game Piece Wind Chime

Upcycled Game Piece Wind Chime
What do you do with an old baking tin and some game pieces? You make a wind chime out of them. I love this idea! The base is an old bundt pan, although you could use any number of things for this. The chimes are game pieces like dice, monopoly pieces, dominoes, and others and they're strung together with fishing wire with a few beads thrown in for beauty and sound.

Tutorial/Source: flickr.com

16. Shabby Chic DIY Wind Chime

Shabby Chic DIY Wind Chime
This shabby chic wind chime uses old skeleton keys and faux pearls to give it a very unique look. The keys sound beautiful when they blow in the wind and the entire chime is just gorgeous. If you want something elegant with just a little kick of creative, this is definitely an idea for you to try. And, if you don't have any old skeleton keys, you can pick them up at flea markets and thrift stores for less than a dollar each in most cases.

Tutorial/Source: cancandancer

17. Vintage Pot Strainer Wind Chime

Vintage Pot Strainer Wind Chime
You can literally make something out of anything. This pot strainer wind chime is proof of that. The base is a vintage pot strainer and the chimes are made of silverware or other old kitchen utensils. It has a wonderful rustic farmhouse look that I love and sounds amazing in the wind. I saw this one on Etsy and knew that I had to share it with you. You can pick it up for around $18.

Tutorial/Source: etsy.com

18. Kids Craft – DIY Key Wind Chime

Kids Craft – DIY Key Wind Chime
This colorful wind chime is the perfect thing for kids to make when its rainy outside. You make it from keys that are painted all sorts of bright colors and tie the keys to a branch or stick with ribbon. If you're like me, you have all sorts of old keys that you don't use anymore – because you don't know what they go to. This would be the perfect way to put those otherwise useless keys to good use and give the kids a craft to keep them busy.

Tutorial/Source: innerchildfun

19. Repurposed Flower Pot Wind Chime

Repurposed Flower Pot Wind Chime
A few terra cotta planters make a wonderful wind chime when you add some string and a ringer. You can choose any number of things to make your chime. The beauty of this project is in the terra cotta base. Paint those pots to match your outdoor décor or to make a really great contrasting statement. This entire project shouldn't cost more than $10 if you have to buy everything.

Tutorial/Source: houseofjoyfulnoise

20. Seashell Wind Chime

Seashell Wind Chime
If you love the beach and you want to bring some of it home with you – if you aren't lucky enough to live on the coast, that is – this seashell wind chime is perfect. Gather up those shells the next time you go on vacation or you can buy bags of shells at craft stores and sometimes at the Dollar Store. String them up with fishing line and attach to a piece of driftwood and you'll be reminded of those beautiful waves every time the wind blows.

Tutorial/Source: poindext