1. Decorate a vase using hot glue.
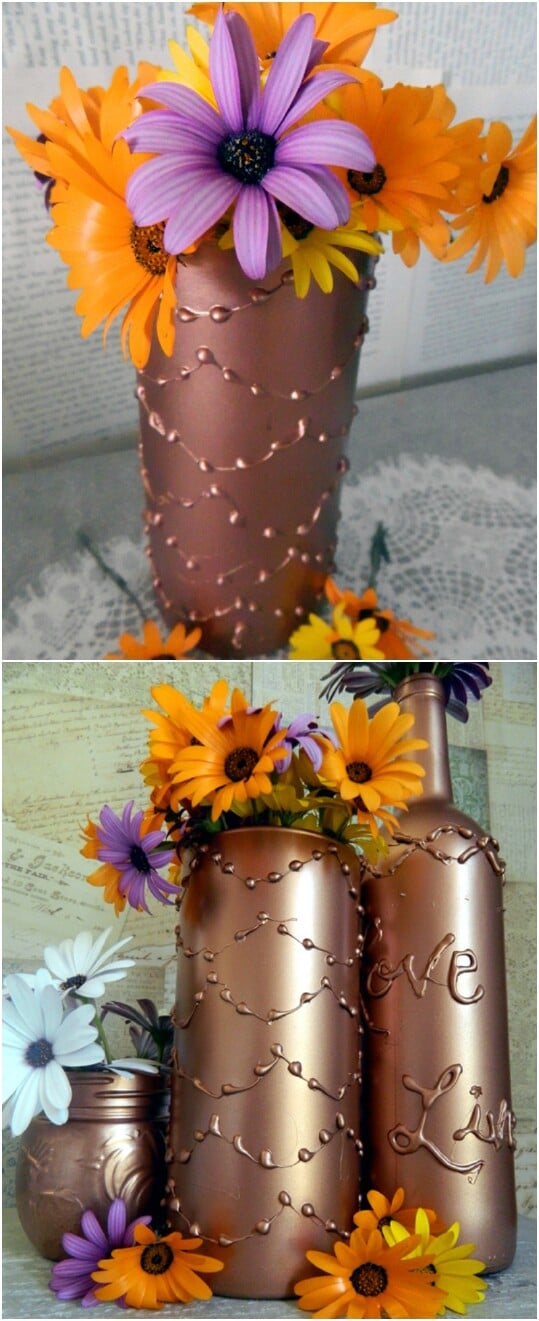
I always thought of hot glue as something you use just to stick things together, but you can actually make really cool decorative art with the glue itself. One great example is this easy project for decorating a vase using tabs of hot glue. You can even write with the glue. Spray paint over it and the glue looks like it is just part of the vase.
Project Source and Instructions: homeheartcraft
2. Make a Decorative Sign
This project teaches you how you can write on a piece of wood using hot glue and make a cute little decorative sign for your home. You can write anything you want and even add designs if you're feeling a little extra creative spark!
Project Source and Instructions: modpodgerocksblog
3. Make glue gun snowflakes.
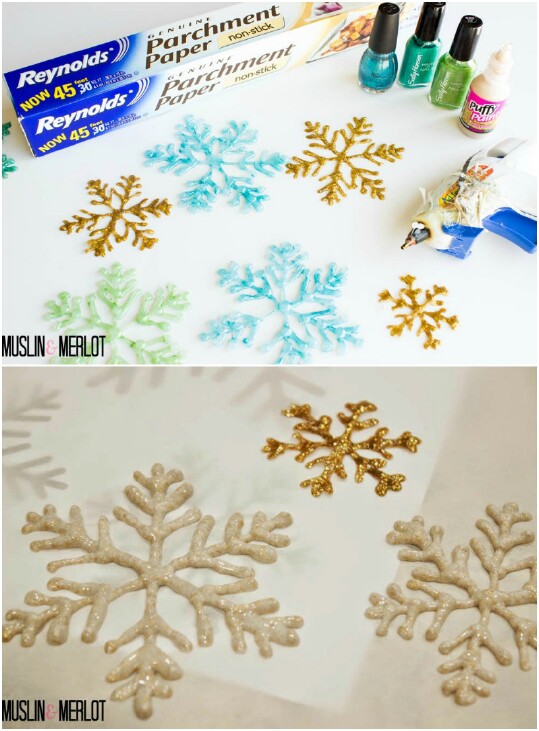
This project is similar to the one for making fall leaves, except instead you will be making snowflakes. The supplies you need are again really basic: the glue gun and hot glue, parchment paper (not wax paper), and nail polish (for the color). If you need help making the snowflake shapes, you can use a printable to guide you. Otherwise, use your imagination and have fun. Another cool idea might be to make paper snowflakes, and then use those to guide you when you create the hot glue shapes!
Project Source and Instructions: muslinandmerlot
4. Make coasters the easy way.
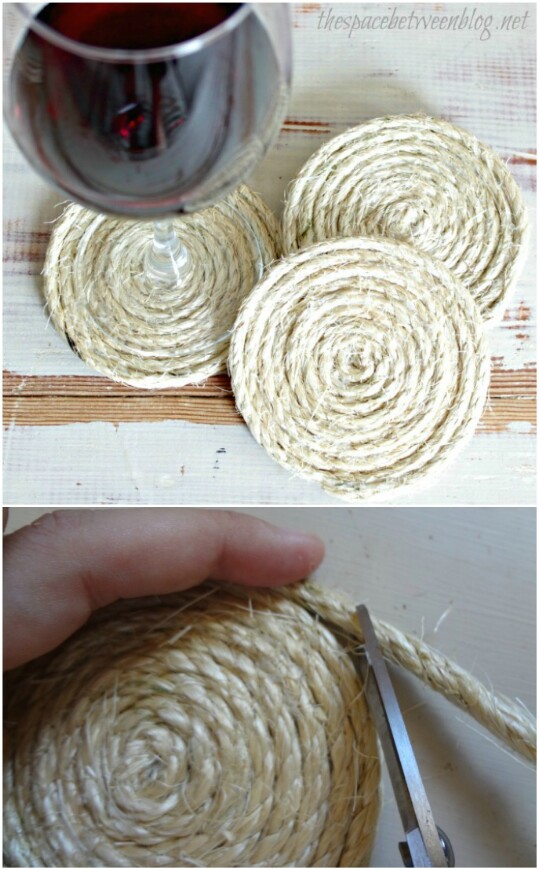
Whether you are throwing a dinner party and want to do something special, or you just want something for everyday life, this project will teach you how to make your very own coasters! They are beautiful and functional, and they have a great rustic appeal. You literally just need some twine and hot glue. You wind the twine around and glue as you go, and ta da! You have coasters you can use or gift!
Project Source and Instructions: thespacebetweenblog
5. Create a coiled rope basket.
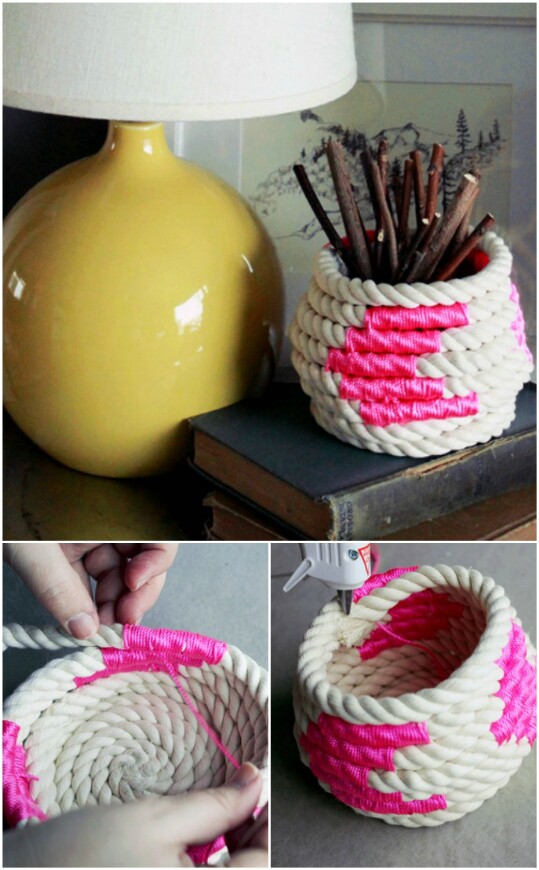
This project is similar to the one above, but it is the "3D" version of it. Instead of coiling twine while it is lying flat on the table, you coil rope upward, gluing as you go. This basket features some hot pink mason line which is added as a decorative element here and there. You could purchase rope and line in any colors you wanted, and you could even get quite elaborate with the designs if you wanted to. It's a beautiful and creative project which would be easy to personalize. The finished result is useful, and would also make an awesome gift!
Project Source and Instructions: designsponge
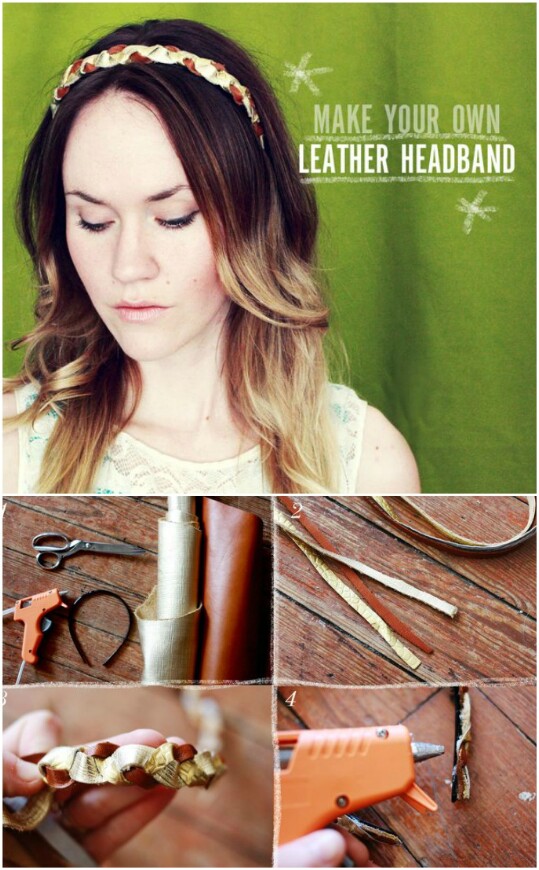
6. Make a beautiful headband out of scrap leather.
Have some old pieces of scrap leather or vinyl lying around unused from other projects? This project will teach you how you can transform them into a lovely hair accessory! You just braid the pieces together and glue them as you go. After you finish, you can wear the headband around the house for a bit to make sure that you didn't miss any spots. If you did, you can go back and glue them. Your headband will be finished and you can wear it everywhere. I imagine while doing this project you might also come up with some other inspired ideas for using leather scraps and hot glue to create cool accessories.
Project Source and Instructions: abeautifulmess.
7. Make a Harry Potter wand!
Have a kid who loves Harry Potter? Want to throw the best themed birthday party ever? Then there is nothing like adding a few awesome props/party favors! These look surprisingly easy to make. You just need to buy a pack of bamboo cooking chopsticks and some brown acrylic paint and foam brushes. You use the hot glue to create the knobby textures which function as the grips for the wands, and then you paint over them so that they look like they are made entirely out of wood. It's a very clever idea, and the finished result looks quite good. I can't imagine how stoked this kid was.
Project Source and Instructions: boxycolonial
8. Create an orb out of driftwood.
If you want to learn how to do something that's totally artsy and amazing with hot glue, then check out this project to build an orb out of driftwood. Looking at it, you'd think assembling this thing would've been nightmarishly difficult. The finished project looks like it's defying gravity.
But it's actually shockingly easy. All that the artist did was inflate a beach ball, and start laying pieces down on it, gluing them together to create a lattice as she went. Once the entire beach ball was covered and all of the driftwood pieces were firmly attached to one another, she just deflated the ball and pulled it out through one of the holes. Genius! I never would have thought of that in a million years. My mind is totally blown!
Project Source and Instructions: creativeinchicago
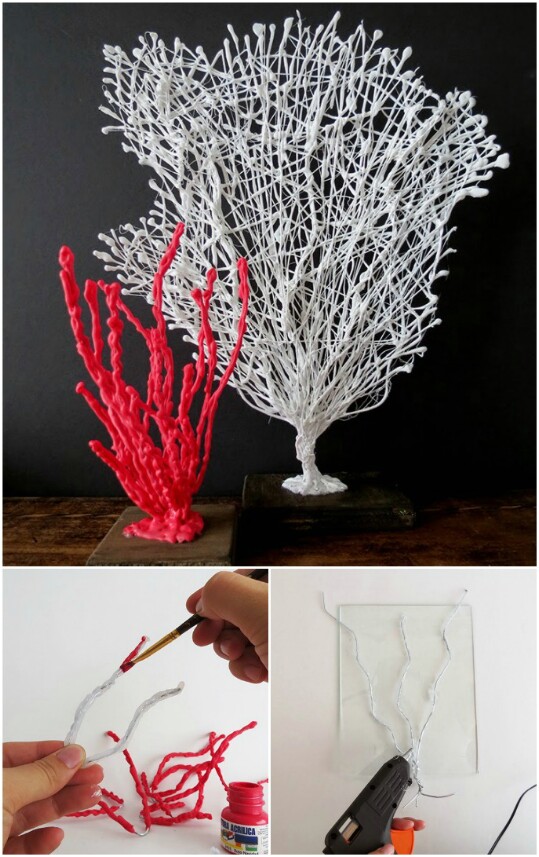
9. Build a coral wire sculpture.
Here is another project which is very artsy. These coral fans were created using wire, hot glue, and acrylic paint. All you do is use wire-wrapping techniques to sculpt the shapes of the branches, and then you add hot glue gun to create the bumpy textures. After that's done, you just paint over it in white or red, and then you affix the finished result to the wood stands. This project would be time-consuming, but probably not too difficult, and the finished coral fans look absolutely awesome!
Project Source and Instructions: ohohblog
10. Frozen-Themed Snowflake Hair Clips
Recall the snowflakes made out of hot glue from earlier in the list? This idea is just a new twist on that one. Instead of using nail polish to add color however, Kimbo over at A Girl and a Glue Gun came up with the idea of using glittery spray paint. The result looks really cool (pun intended—I know, not the best one, right?).
Kimbo used hot glue to attach bobby pins to the backs so that the snowflakes can be worn as hair clips! They made the perfect finishing touch to her daughter's Elsa costume.
Project Source and Instructions: agirlandagluegun
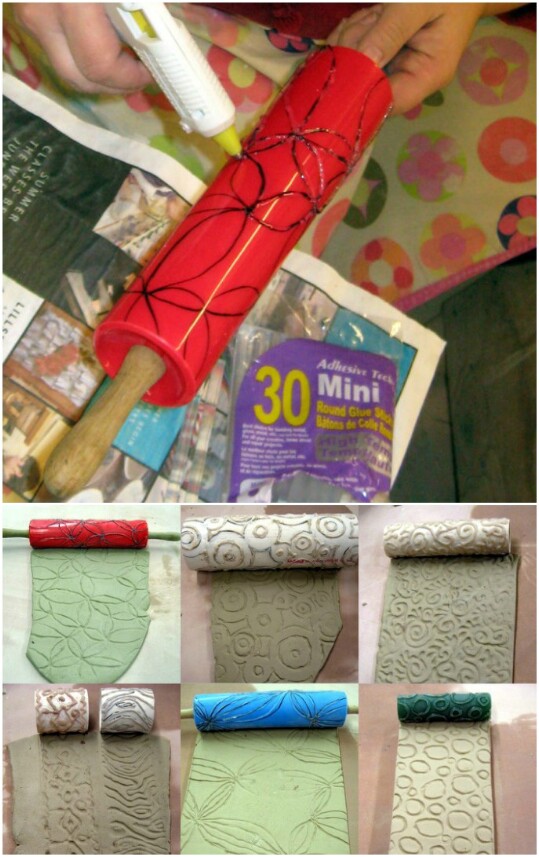
11. Make a Textured Roller for Clay
Looking for an easy way to add textured patterns to clay? One great trick is to create a roller which has the texture already on it. Naturally this isn't a supply you are going to find just anywhere, so it is something you need to make yourself. Of course, what is cool about this is that you can customize it with any type of design you want.
You need to start with some kind of a roller—it doesn't matter what, something like a PVC pipe or an actual rolling pin works fine. You then are going to use a sharpie to draw a pattern onto the pin. Once you have something you like, you go over the top of it with hot glue. Wait for it to dry, and you'll have a roller covered with a texture that can indent soft clay. This makes it a breeze to create beautiful repeating patterns!
Project Source and Instructions: potteryblog
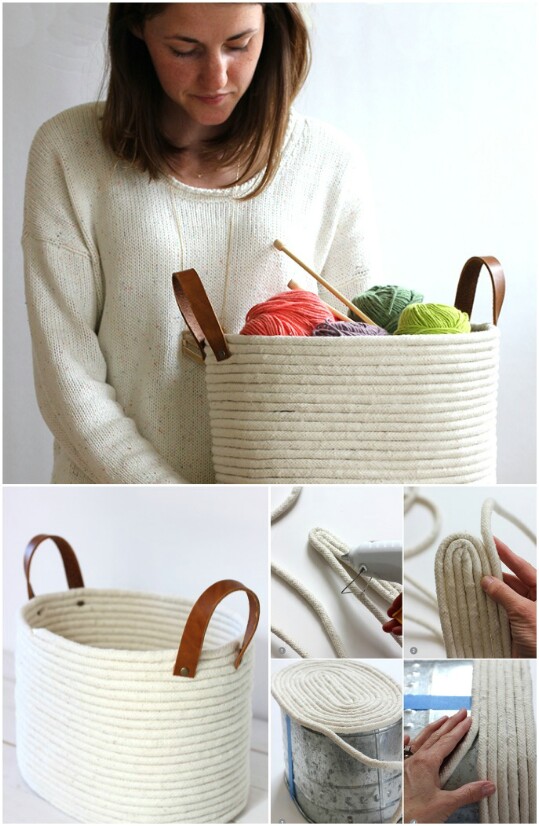
12. Make a No-Sew Rope Coil Basket
This project works on the same premise as the coasters and the little rope basket from earlier, only this time you are going to be doing it on a much larger scale. This is quite a large bag with handles attached which you can use to carry stuff around. I would probably only put relatively lightweight objects in here so as not to strain the glue (like the yarn balls in the photo).
This project makes clever use of a pail. You use the pail as a guide for the rope as you put it down. The pail holds the shape of your creation while it is drying. You follow the same basic process that you used on the smaller rope basket from before. The finished basket looks incredible!
Project Source and Instructions: aliceandlois
13. Jazz Up a Boring Vase
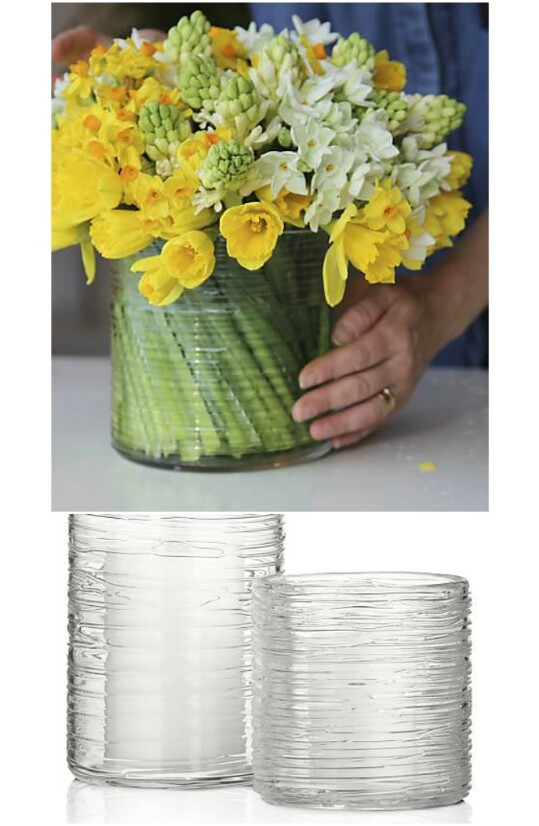
Have a boring, basic vase that you want to add a little pizzazz to? This project is an awesome way to do it! You literally just get a plain, clear vase and work your way around and around it with a hot glue gun and then wait for it to cool. You will get an awesome texture!
Project Source and Instructions: thebudgetdecorator
14. Look at these snazzy hot glue earrings!
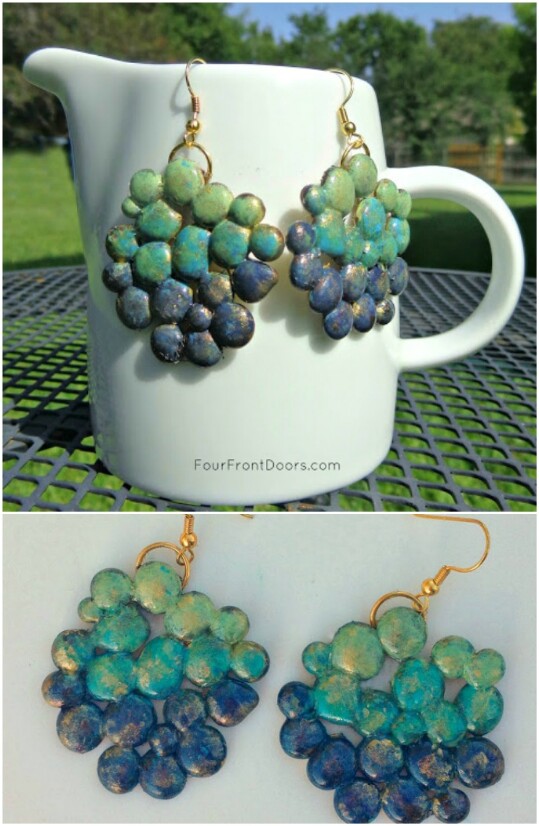
Want to add a really nifty item of jewelry to your collection using a few cheap supplies and a lot of imagination? These earrings are made out of cooled droplets of hot glue which have been coated in acrylic paint. It is easy to identify them as hot glue since they are in this list, but if you just ran into someone wearing these somewhere at random, would you have ever guessed their earrings were made out of glue?
These are awesome not only because they have a quirky design, but also because they must be delightfully lightweight and comfortable to wear! You could modify this design into a lot of different nifty ideas too!
Project Source and Instructions: fourfrontdoors
15. Make a Confetti Cake Topper
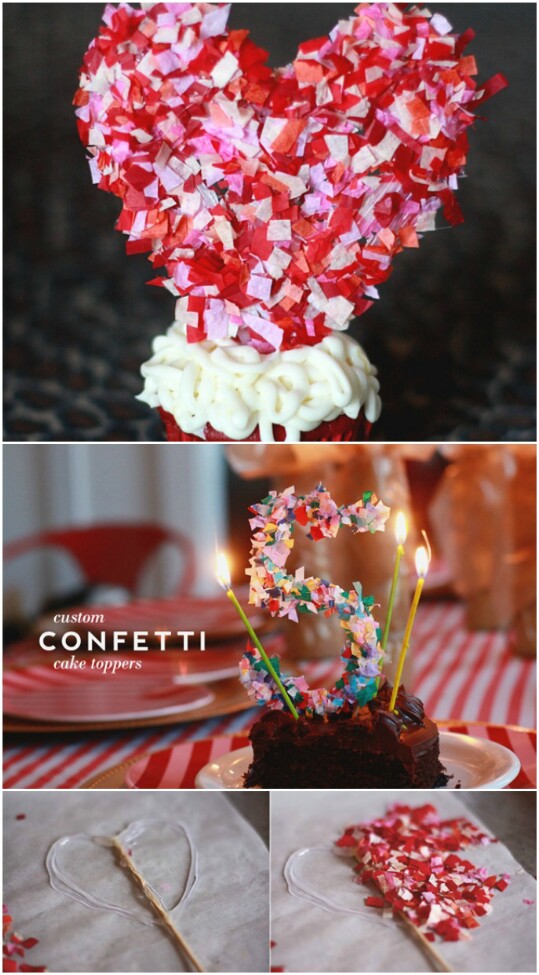
There is nothing quite like hot glue for creating simple shapes easily and quickly which you can use for just about anything. This project just involves making the number or letters or whatever other shapes you want with hot glue, inserting a toothpick, and covering the result with confetti. The confetti conceals the glue and looks festive and fun. This would be an easy and fast way to jazz up any cake!
Project Source and Instructions: auntpeaches
16. Make Pretty Votive Candleholders
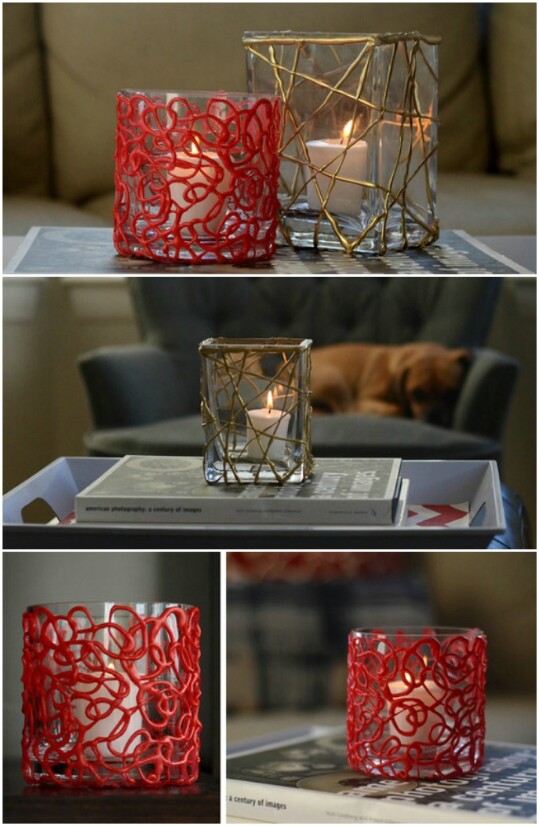
This project is similar to a number of glue gun ideas we have already shared with you, so you should by now have a pretty good idea how to do it just from a glance. You cover a candleholder in glue gun in whimsical patterns, wait for it to dry, pull the candleholder out, spray paint the glue, and then insert the candleholder inside again. I especially love the effect she achieved with the metallic gold paint. It gives the striking illusion that the candleholder really is covered in a cool metal sculpture and not just dried glue! Just looking at this, I get so many different ideas for cool patterns and colors you could try!
Project Source and Instructions: curbly
17. This Ice Queen Masquerade Mask is Coooooool!
If you liked the snowflake projects earlier, then you will love this masquerade mask which would be suitable for any ice queen or snow queen! It really is astounding that this is made out of hot glue; it truly does have a spectacularly icy look to it. This would make a great addition to a wintry costume.
Project Source and Instructions: klairedelys
18. Turn an Old T-Shirt Into An Old Headband
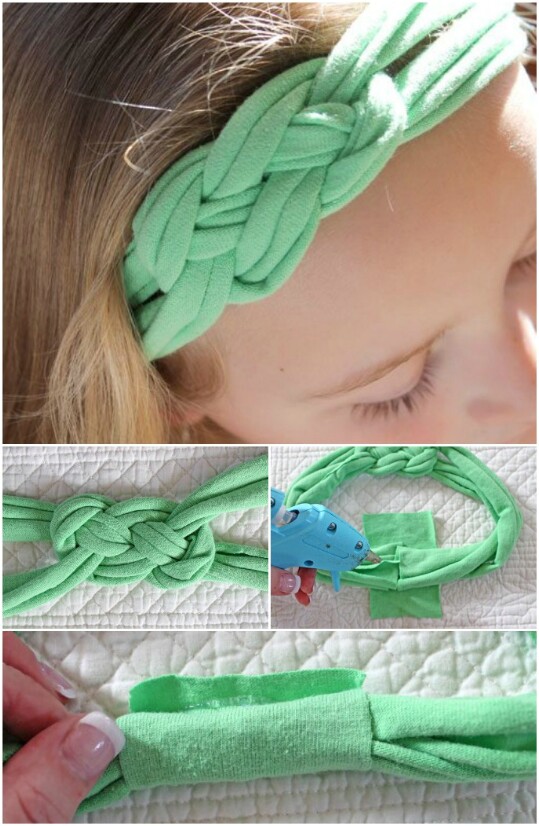
If you liked the earlier project for turning leather scraps into a headband, you will love this simple variation. This project is very similar, but instead of upcycling leather scraps, you'll be upcycling an old T-shirt! You don't need anything for this project except the old shirt and your hot glue and a pair of scissors. The project does require you to tie some rather complicated-looking knots, but the tutorial is easy to follow, and the finished headband is so cute!
Project Source and Instructions: ehow
19 Make beautifully sparkly fall leaf decorations out of hot glue.
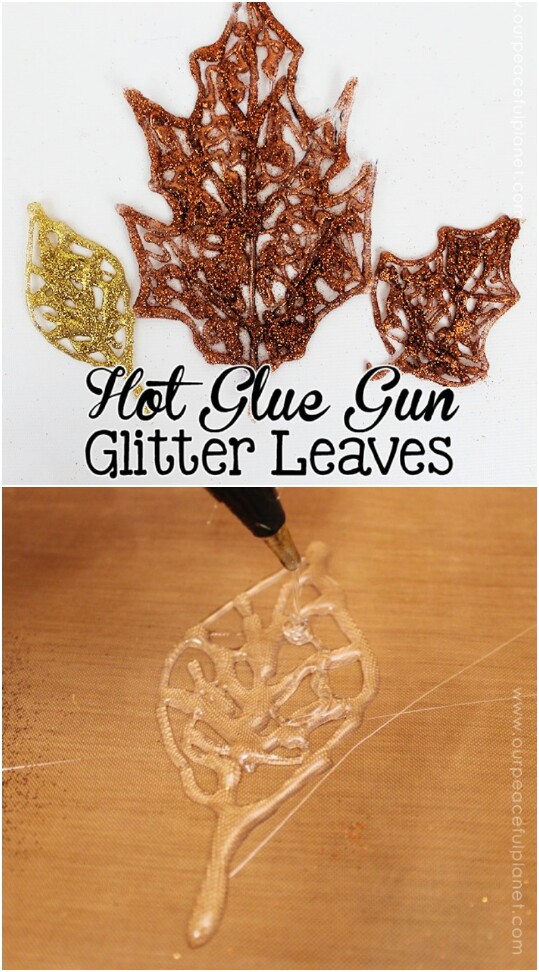
Looking for a project for fall this year? This easy project teaches you how to make autumn leaves using nothing more than hot glue, glitter, and foil. You can put these leaves in your windows or scatter them around the house to add a little autumnal charm. You could also very well just switch the colors from gold and copper to green and make spring leaves as well!
Project Source and Instructions: ourpeacefulplanet
20. This Melted Snowman Ornament will Melt Your Heart
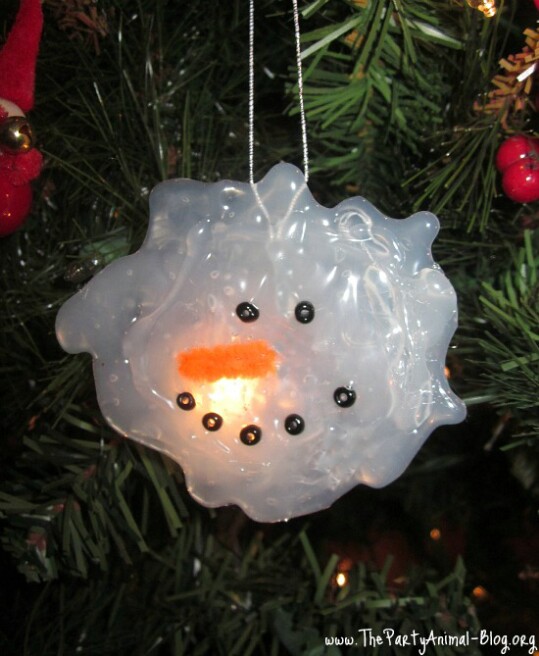
When it gets around to the holiday season, there are so many fun crafts you can do with your glue gun, and this one is particularly clever and easy! You just use hot glue to make a "melted" snowman face. Personally I've never seen a melted snowman that looks so happy! The hot glue lets the light shine through on the tree, so it comes out looking really spectacular.
Project Source and Instructions: hepartyanimal-blog





No comments:
Post a Comment