The next time you open up a bottle of wine, think about what you are going to do with the cork once the bottle is empty. Really. Corks make great craft materials and there are so many different things that you can make with them.
Even if you don't occasionally drink wine, you can find corks at most flea market and yard sale type places. When you do, grab a bunch of them because we've got 25 different crafts that you can make with those old corks and you won't believe some of these.
From a complete bar top to a bath mat, there are so many different ways to upcycle old corks and most of these are so easy that you can do several projects in one day.
If you've ever wondered what to do with a bunch of old corks, you don't have to wonder any longer. We've got the perfect solution to help you to get those corks out of your drawer and you can make some really useful things with them.
Grab a few corks and let's get started. You're going to love these fun and easy cork projects.
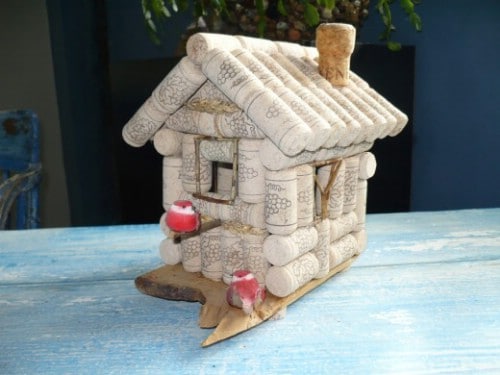
Wine Cork Birdhouse
Use up those old wine corks and give your birds a special place to live. This wine cork birdhouse is really easy to make and looks absolutely beautiful in the yard. You will need quite a few corks, around 90 for a good sized house, and a few other supplies. You basically just glue the corks together (around 12 for each side) and then attach the pieces to each other. You can add the roof and any decorations that you want and don't forget to leave a hole in the front so that the birds can get in.
DIY Instructions and Project Credit – Suzzycue
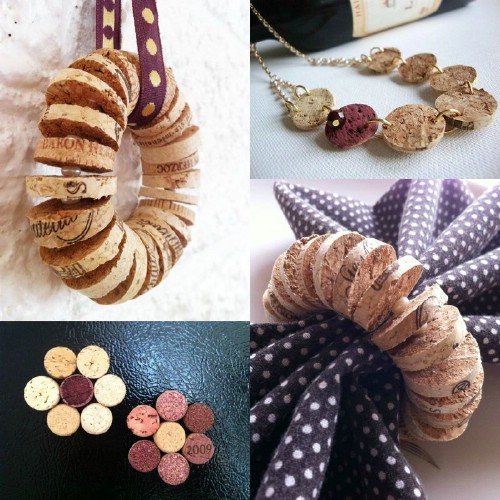
Wine Cork Napkin Rings
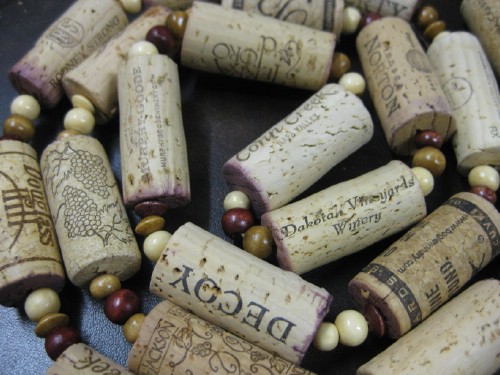
If you really want to dress up a dinner table, these wine cork napkin rings are perfect. To make them, you will want to cut the corks into slices and you can use as many slices per ring as you want. You will need about 3 per ring to make them really full and you'll need some heavy stretchy thread and beads for decoration. Just drill a hole through the slices and alternate cork and beads onto the stretchy thread until you get the size that you want. This project is really easy and would make a wonderful gift, especially when you pair it with cork coasters or wine glass charms.
DIY Instructions and Project Credit – Brasspaperclip
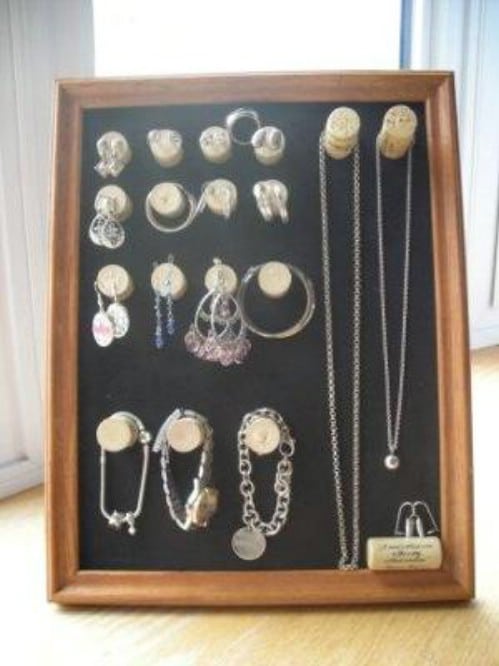
Wine Cork Jewelry Display
You can create a beautiful place to hang jewelry with a few wine corks, an old frame and a few other supplies. Cover the board and stand of the frame with fabric of your choice. Then just add the corks in whatever design you want. If you cut them in half, they'll work better. Glue them into place onto the fabric using hot glue or something similarly strong. Then just put the frame together without the glass and hang up your favorite necklaces, bracelets, and hoop earrings. This makes a great gift idea, too.
DIY Instructions and Project Credit – Crafts-for-all-seasons
Cork Refrigerator Magnets
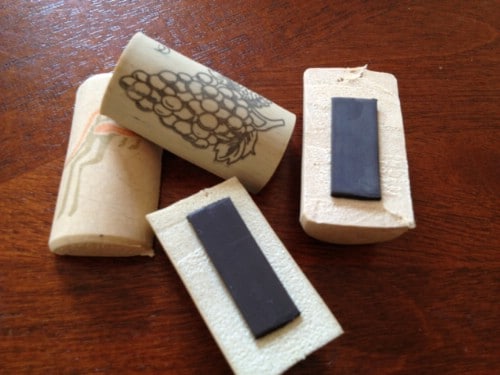
You can make great little magnets for holding the kids' artwork on the fridge with those old wine corks. You will need to cut them in half lengthwise and then the magnet gets hot glued to the flat part. You could also cut them into slices and make them round if you want to go that route. They'll hold those pictures or recipes on the fridge perfectly and they are very unique as far as kitchen magnets go. Plus, they're cheap and easy to make. You just need two or three corks, some glue, and a few magnets to create an entire collection of fridge magnets.
DIY Instructions and Project Credit – Missmelandmissheather
Shell Stoppers
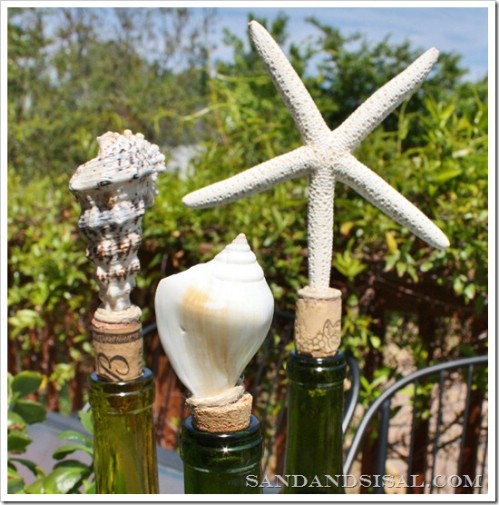
If you tend to enjoy a little wine now and then and you love those gorgeous stoppers that sit atop those bottles, you can make your own out of corks and a few seashells or whatever else you have an inclination to use. Decorative wine bottle stoppers can be a bit expensive but since you already have the cork, you just have to add the decorative touch. These seashell stoppers are beautiful and they are so easy to make that you just won't believe it. Just gather up the seashells that you want to use and attach them to your corks. You do have to narrow down the cork just a bit but overall, this is a really easy project.
DIY Instructions and Project Credit – Sandandsisal
Cork Keychains
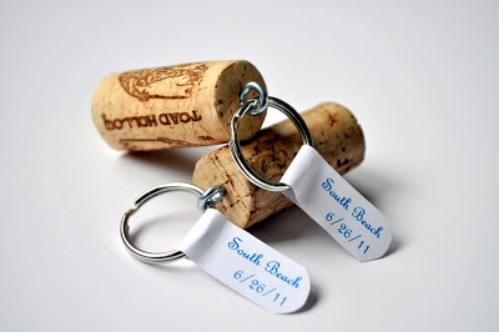
Stop wondering what you're going to get for that person who has everything and make them a great little cork keychain. These are perfect for birthday gifts for people who really are difficult to buy for or you could just make them for yourself. You can make several of these in an afternoon and they're great for hostess gifts for showers or parties. Just screw the hardware into the cork and you're all set. Really, what could be easier? Plus, you get to use up those old corks and make them functional again.
DIY Instructions and Project Credit – Cleverlyinspired
Cork Tacks
If you have a bulletin board, you can create beautiful thumbtacks out of those old corks and dress it up a bit. (We've also got a great cork bulletin board that you can create to go along with those thumbtacks). Please be very careful when inserting your thumbtacks. You certainly don't want to stick one through your finger. That being said, all you really have to do is buy a few cheap thumbtacks – the Dollar Store has them for around $2 for 60 – and then glue them into your corks. Let the glue dry for at least 24 hours and then you're ready to decorate that bulletin board in style.
DIY Instructions and Project Credit – Thewoodenbee
Cork Bulletin Board
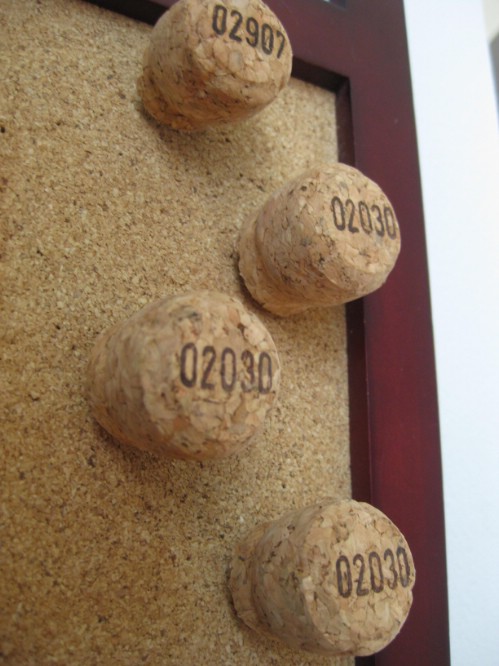
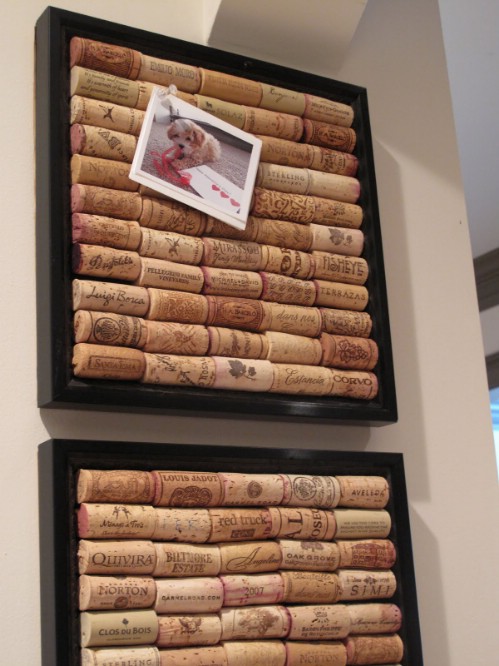
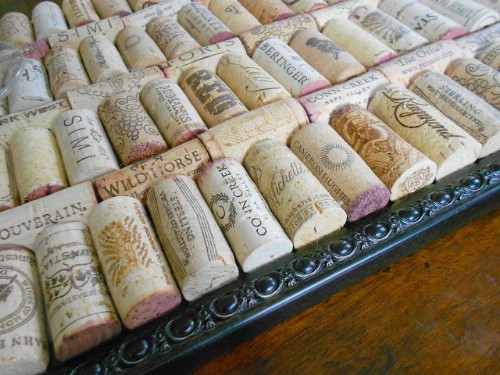
This cork bulletin board is perfect to go along with those cork thumbtacks and it's much easier to make than you may think. You'll need a picture frame, old mirror, or something similar for the base. Then you just add the corks and be sure to glue them into place really good. If you are using a rounded base, you'll need to cut down the corks so that they'll fit. The great thing about squared picture frames is you just have to glue in the corks and you're all finished. The corks perfectly hold thumbtacks in place.
DIY Instructions and Project Credit – Simplyem
Cork Canapé Knives
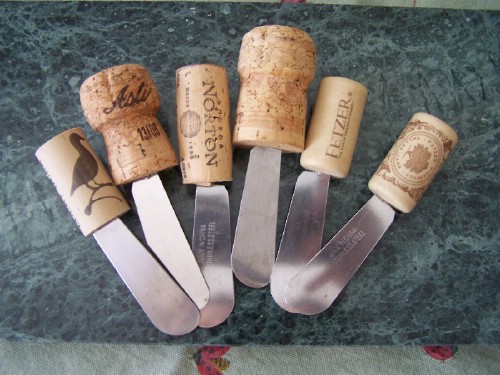
If you have an old set of canapé knives that need a facelift or the handles are broken or damaged, you can replace those handles with your corks. Not only does this work perfectly for making those knives useful again, it looks great. This one is so very easy. You simply make a slit in the end of your cork and then just shove the end of the knife into it. You don't even have to glue it in unless of course, you feel better knowing that they're glued. The cork itself will hold the knife in place and keep it from moving. These would make wonderful gifts for the Holidays. Just add your favorite cheese ball recipe.
DIY Instructions and Project Credit – Yarnigras
Wine Cork Herb Markers
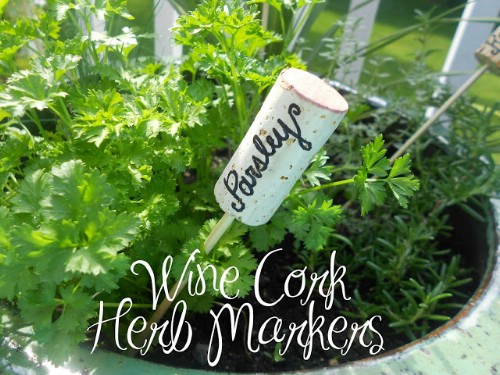
To make herb markers, which are really handy for keeping your herbs straight, you just need to write the names of your herbs on the corks and then insert a wooden skewer. Then just push your new markers into your herb containers or garden. This one takes just a couple of minutes for each herb and it helps you to identify them even if they haven't really started growing yet. When you need an herb, you'll know which one is which so this project is perfect for those who are just beginning with herbs. Plus, the cork markers look really pretty.
DIY Instructions and Project Credit – Shineyourlightblog
Magnetic Cork Planters
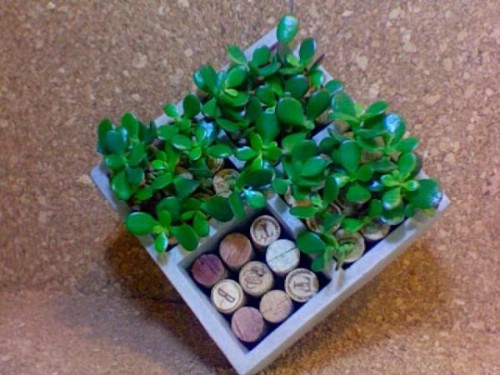
Make a number of gorgeous little planters for your favorite succulents with old wine corks. You will need to hollow out the center of the corks, which should be done carefully so that you don't crack or break the cork. Then simply add a magnet to the back with a hot glue gun. Once you're ready to stick them up, put just a tad of potting soil inside and add your succulent. You can hang them on the fridge or anywhere outside that is metal. These are great and would make wonderful gifts. Plus, they really don't take much time and you can literally do hundreds with a small bag of potting soil.
DIY Instructions and Project Credit – Stylebaggage
Wine Cork Topped Dresser
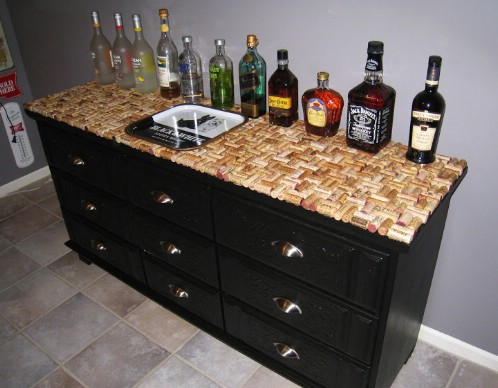
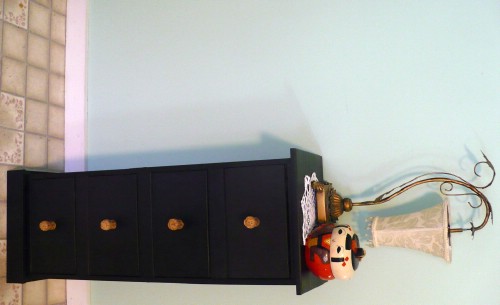
If you have an old dresser that needs a facelift, corks are the answer. This dresser is actually turned bar by using corks and it's absolutely gorgeous. You will want to reface the dresser with stain or paint and then add your cork top. Liquid nails are perfect for keeping the corks in place and you can create a design if you want. You will need several corks for this project. If you don't really need a bar, just use it as a dresser or anything else you want. It's beautiful and will look great anywhere you put it.
DIY Instructions and Project Credit – Decoratingobsessed
Wine Cork Coasters
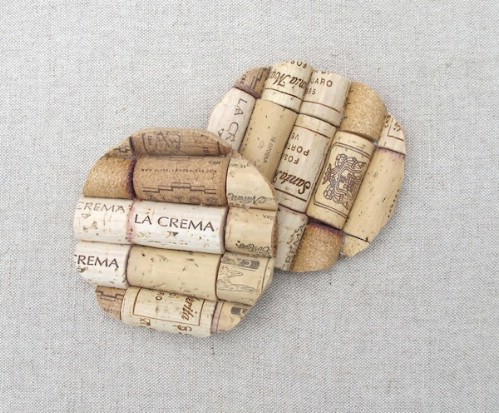
Make a great little coaster set for setting your wine glasses on the tables from the corks of empty bottles. These coasters are easy to make and only require a few materials. You will need about 20 to 25 corks for a set of four coasters and some think cork paper circles to create the base. Just cut the corks in half lengthwise and then glue them to the tops of the circles using a hot glue gun. This is another project that would make a wonderful gift or you can keep them for yourself. The corks are perfect for keeping liquids off your tabletops and they look really nice, too.
DIY Instructions and Project Credit – Heartmadeblog
Wine Cork Topped Trunk
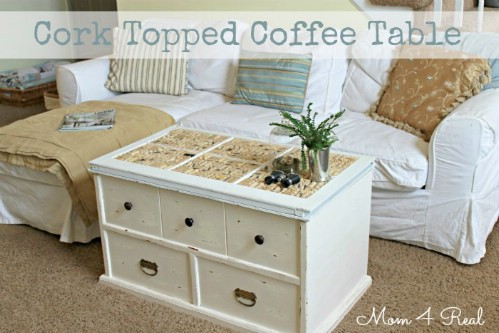
If you need a new coffee table, a wine corked trunk works perfectly. You can find an old trunk (if you don't already have one that you can use) at thrift stores or yard sales for less than $10. Repaint or stain it whatever color you want and then add the cork top. You can use an old window frame for the top and then just glue the corks onto it with a hot glue gun. Add the top to your trunk with liquid nails or something similarly sturdy and you have a beautiful new coffee table for less than $20 and that's if you have to buy the trunk and the corks.
DIY Instructions and Project Credit – Mom4real
Wine Cork Bath Mat
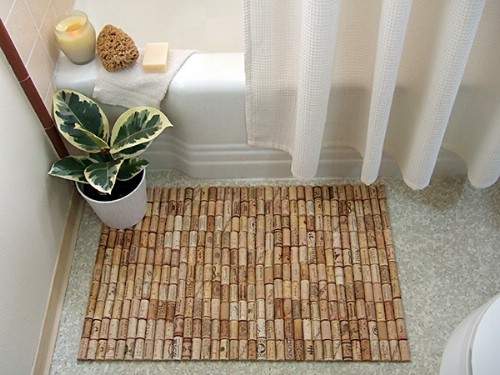
Create a stunning bath mat from those old corks and kill two birds with one stone (or cork in this case). You can save money by not having to purchase a decorative bath mat and you can upcycle those old corks into something beautiful and very useful. You'll need close to 200 corks for this one as well as a hot glue gun and shelf liner for the bottom. This cork bath mat resembles a bamboo mat, which is really expensive. So, you get a beautiful decorative mat for just a fraction of what a bamboo mat would cost.
DIY Instructions and Project Credit – Craftynest
Cork Stamps
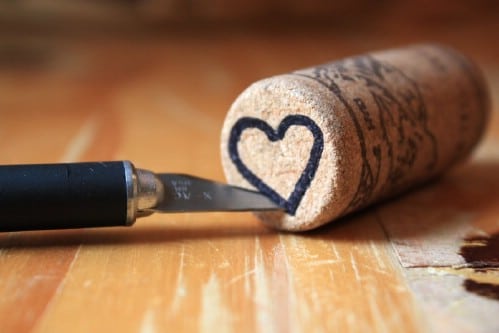
If you love scrapbooking or you just like using stamps, you can turn those old corks into great little stamps with just a few minutes and a few supplies. You'll have to mark off the design that you're making with a Sharpie and then use a very sharp exacto knife to cut away the extra cork. Note that you want to use very spongy corks for this project. If your corks are too dry they will crumble. Once you have the design carefully cut away, just dip them into your inkwell and you have the perfect little stamps for all of your stamping projects.
DIY Instructions and Project Credit – Sweetspotcards
Cork Cabinet Knob Stoppers
With some old cabinet knobs and a handful of corks, you can create beautiful bottle stoppers that are perfect for wine bottles or any other bottle you want to decorate. You will need to carve the end of the cork down just a bit so that it will fit somewhat loosely into your bottles. Then just attach the cabinet knobs using hot glue or liquid nails and a rather long screw. These are so gorgeous and would make wonderful gifts if you are giving something in a bottle.
DIY Instructions and Project Credit – Condoblues
Cork Artwork
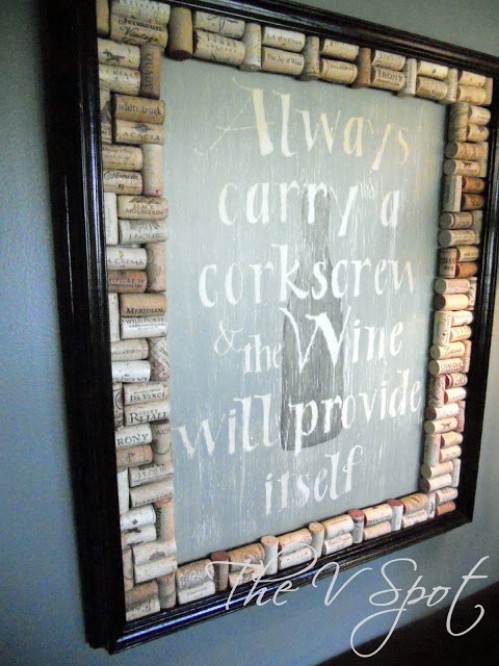
You can create beautiful artwork with a few corks, an old picture frame and a little imagination. Just hot glue corks around your picture frame and then add any art that you want. A piece of plywood is perfect for painting your own special message and the corks around the frame give it a really rustic look. You could also just add the corks to any frame that you have pictures in. However you choose to do it, using corks to decorate otherwise dull frames gives them an instant facelift and it's a really easy project.
DIY Instructions and Project Credit – Thevspotblog
Wine Cork Wreath
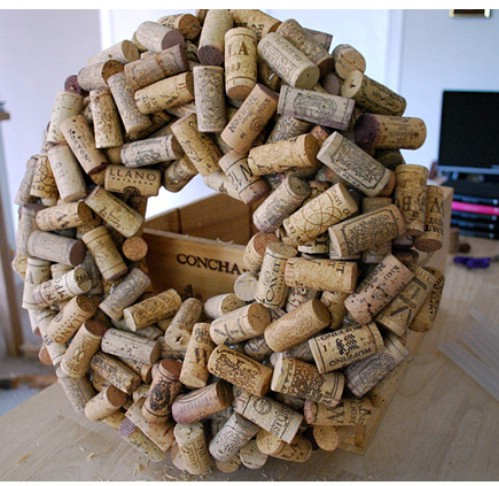
Oh how we love DIY wreaths and this wine cork wreath is both gorgeous and easy to make. You will need a straw wreath for the base and a handful of corks for decorating. The best thing about this project is you can do it however you want. While you should begin with a single layer of corks (that you'll hold in place with hot glue), you can stack them, toggle them, or do whatever you want with them once you have the base covered. If you want a really full wreath, stack them in different directions and you can add other decorative elements as well if you want.
DIY Instructions and Project Credit – Save-on-crafts
Wine Cork Place Card Holders
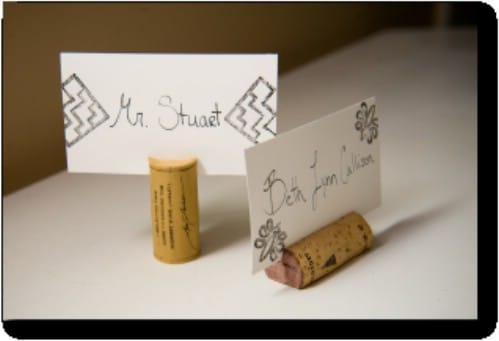
If you have a wedding, dinner party, or other occasion coming up, you can create lovely place card holders with those old wine corks. Cut the corks in half lengthwise so that they'll stand up by themselves. Then, cut a slit in the rounded part (the flat part will lay on the table) to insert the name card. You can use cardstock for the names and do whatever you want to make them look special. Then simply insert your name cards into the slits on the top of the cork. They'll stay perfectly in place and will make your table look beautiful.
DIY Instructions and Project Credit – Clarksvillebrides
Cork Drawer Knobs
Making drawer knobs is a bit more complicated than some other projects but it's definitely worth the extra effort. You just need corks, screws, and a small screwdriver. You can cut the corks down a bit if you want to make them a little more decorative or just use them the way they are. You'll want to find screws that will fit into the slots after you remove your existing knobs and then just insert the screws and screw the corks into them. If you use the corks the way they are, this one will only take a few minutes. If you want to use an exacto knife and carve the corks though, it will take a bit longer.
DIY Instructions and Project Credit – Dollarstorecrafts
Wine Cork Wine Charms
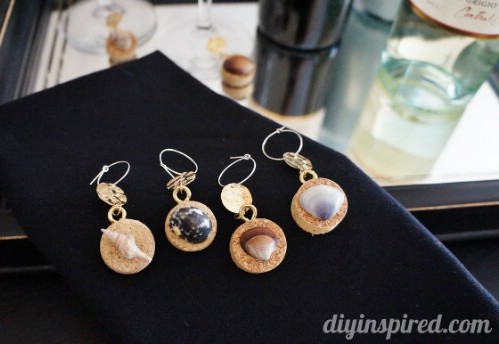
Wine glass charms are really nice but they can be rather expensive. Besides, we'd much rather do things the DIY way. You can make six charms from a single cork. You just have to cut the cork into six slices, being careful that you don't crack it. Use a really sharp knife. Using hot glue or something similarly strong, you will want to glue your chosen decoration onto each circle. Seashells work really well or you could use jewelry making supplies or anything you want. Screw a small picture frame eye hook into the top of each circle and add wire. A hoop earring notion works well here. Plus, you could add an additional charm if you want.
DIY Instructions and Project Credit – Diyinspired
Wine Cork Baseboard
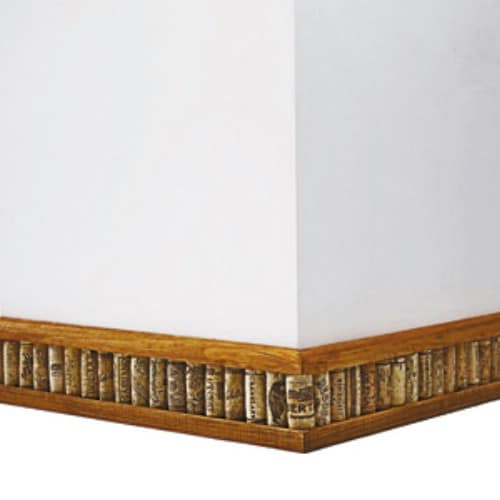
If you have several corks (and we do mean several) and you want to change up your home décor just a bit, consider creating a baseboard of wine corks. This is not nearly as difficult as it sounds and it looks absolutely gorgeous. You just glue the corks side by side onto a base of MDF board and then cut them to make them even. Attach thin molding to the top and bottom and nail the cork baseboard to your walls. This is a great idea for dens, kitchens, or just any room that you want to make a bit special.
DIY Instructions and Project Credit – Thisoldhouse
Wine Cork Garland
Make decorative garland for Christmas, birthday parties, or any other celebration. You just have to tie rope garland around your corks or you could go all out and drill holes into the corks and stick the rope through. Once you have the corks attached, just add whatever other decorations you want. For the Holidays, add plastic cranberries or holly or even a few real pinecones. You can decorate the garland however you want and it looks great hanging on the tree or across the mantel. You could also paint the corks if you wanted or decorate them in other ways before hanging.
DIY Instructions and Project Credit – Thewoodenbee
Wine Cork Serving Tray
Make those dinner parties extra special when you serve drinks on this DIY wine cork serving tray. This one is so very easy to make and you can do it from things that you have on hand. That is, if you have a few corks and an old frame. You can make your own frame for this one or use an old picture frame that is relatively large. The corks are perfect for serving and if you add cork tiles or circles to the back, you can keep it from scratching your table. Dinner guests will adore being served from your wine cork tray and you'll love how cheap and easy it is to make.
DIY Instructions and Project Credit – Shineyourlightblog

No comments:
Post a Comment