Thursday, March 2, 2017

DIY Gorgeous Teddy Bear Pom Pom Rugs + Bonus Colorful Rugs

We've discovered the most adorable pom pom rugs with which to decorate your little boy or girl's room, or perhaps their play area. The kids will love the soft touch and cute sheep or teddy bear design, and you'll love how easy it is to make! The pom poms go quickly; simply wrap yarn around your fingers, then tie a string of yarn around the middle of the ball, cut the loops and trim to make the perfect round shape – it really is that simple, and a lot cheaper than actually buying pom poms.

Cute DIY Teddy Bear Pom Pom Rug

You can watch this short video if you need a bit more help. Or check Bella-Dia’s picture step by step guide here.

For the FREE teddy bear pattern for the happy teddy bear rug, just click here (The website was translated from Italian to English). The uncomplicated pattern calls for a bit of crocheting, sewing and knitting. If you're worried the white may get dirty quickly with your little one, feel free to change it up and choose your own colors.

For a more colorful and easier Pom-Pom rug you can just follow this tutorial here:

Colorful DIY Pom Pom Rug

These little rugs are so charming you just may end up keeping them for your own room!

Seduce Anyone with this Heavenly Braided Nutella Bread

Bread and Nutella go together like break-ups and ice cream, girls' night and wine, cats and the Internet. To us, this delicious Nutella treat is the new cinnamon bun! We've got a very easy-to-follow video that guides you through every step of the process, so "I'm not such a good baker" really is no excuse to miss out on this one – you just need to be able to follow instructions. The best part is that the finished product looks exquisitely impressive, but the effort doesn't really reflect that.

Seduce Anyone with this Heavenly Braided Nutella Bread

The dough is an enriched dough which is very similar to brioche; for that you'll need bread flour, sugar, dried instant yeast, salt, butter, full cream milk, and two eggs. After mixing, you can knead the dough by hand – you may find that it's actually quite therapeutic. The dough takes a few hours to rise and the actual baking time is about 15 to 20 minutes so make sure you plan ahead.

The end result is a gooey, chocolatey, floral-shaped piece of heaven that you and your friends or family can simply pull apart and devour. Enjoy, and you're welcome!

Ingredients:

450g /1lb of Bread Flour
70g / 1/3 of a cup of Sugar
2 Teaspoons of Active Dried Yeast
A pinch of Salt
30g / 1oz of melted Unsalted Butter
180ml / 3/4 of a cup of warmed Milk
2 Egg Yolks (keep the whites to glaze the bread)
1 cup of Nutella

Bake at 180’C /350’F for 15 – 20 minutes

Video Instructions by Steve’s Kitchen

Beautiful Photos by Anna and Curios and Knickknacks!

Wednesday, March 1, 2017

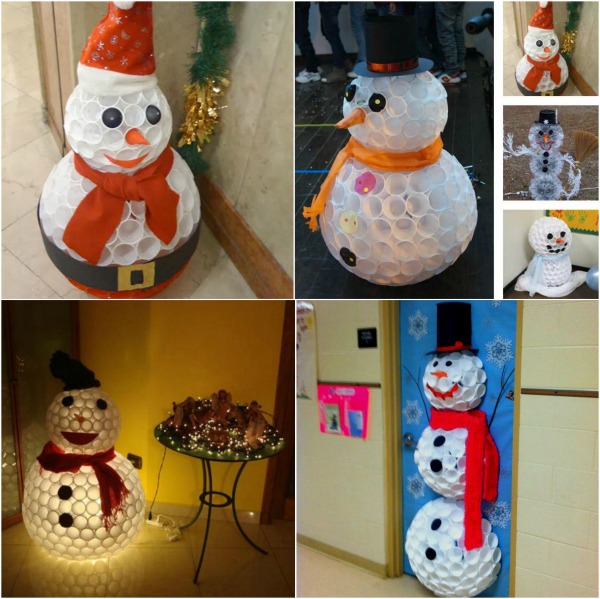
Creative Winter Craft: DIY Snowman Made from Plastic Cups

Creative Winter Craft: DIY Snowman Made from Plastic Cups
You don't actually have to brave the cold and snow to make your own snowman, nor do you have to go out to buy a readymade decorational one if you can easily make your own at home. All you really need is some cheap white plastic cups, a stapler, some colored paper or cardboard, and that inevitable red Santa hat that we all have lying around. You could even make your own top hat if you don't have one just by rolling a black piece of paper into a cylindrical shape, stapling it closed, and securing it to a round piece of the same paper.

Video Tutorial by Mixmax

Video Tutorial by Anamaria

Simply staple the cups side by side (openings facing outwards as if they were lying on their sides) to make a circular shape. Then continue to build this upwards until you have half a sphere. Repeat his to make another sphere and then staple the two together for the body. Do the same but smaller for the head. For the carrot nose you can just roll an orange piece of cardboard so that it makes a point, and for the eyes, just cut out two black circles. The outfit is up to you: you can make a little Santa outfit with the leftover paper, cut out traditional buttons, or drape it in some flashy tinsel.

This is a really fun, cute and easy-to-do DIY project, and it's also a great one to get the kids involved in!

The Only Cake Decorating Trick You’ll Ever Need

If you love baking then you'll be all too familiar with the inevitable and unsightly mess that comes with creating beautiful cakes and cupcakes. It's rather disheartening to see the cleaning that still lies ahead after spending your time making those delicious treats. Icing seems to be one of the biggest problems; if you're using more than one color then you have all the mixing bowls to clean, along with cleaning your piping bag in between the different colors. From this day forth, though, this will no longer be a problem.

The Only Cake Decorating Trick You'll Ever Need

First things first; you don't actually need to mix your icing colors in separate bowls – you can use the same one and you don't even have to clean it out. Start with mixing your lightest color first. As long as you really scrape out as much as you can when you're done, you can carry on mixing your next color without it being tainted by the leftovers of the first. Just make sure you go from lightest to darkest.

Video by Karen’s Cookies

Now for the real trick: the piping bag miracle…

  • Cut a square of plastic wrap and dump out the icing in the center.
  • Fold over one half—corner to corner—so that you make a triangle shape.
  • Roll it up so that you're left with a fat little sausage of icing with two long tails of plastic wrap on either side; twist the tails up.
  • Take your little icing pouch and slip into your piping bag so that the tail ends stick out both the top and bottom. At the smaller end, pull the tail tight so that the actual icing is near the tip.
  • Secure the other end with a rubber band.
  • Snip off the tail at the coupler end, put your tip on, and screw on the coupler.

Ta da! When you're done you can simply take off the rubber band and pull out the plastic wrap, leaving you with a clean-as-new piping bag, ready for the next one. All you've dirtied throughout this whole process is one bowl and one spoon.

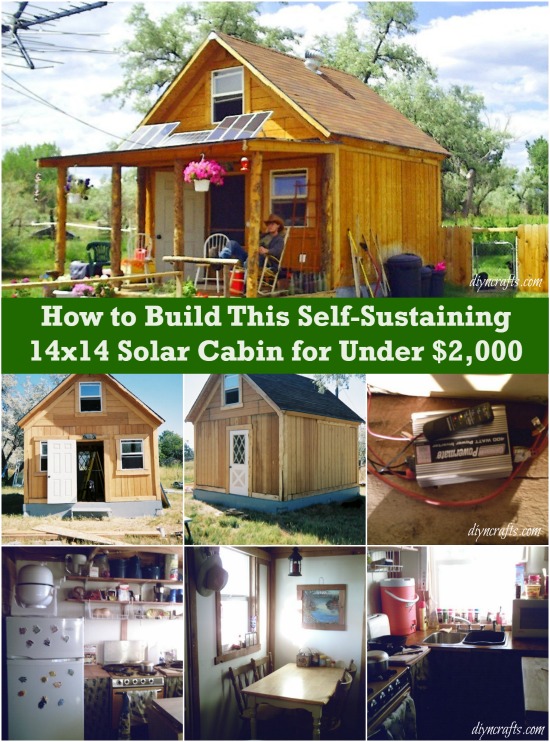
How to Build This Self-Sustaining 14×14 Solar Cabin for Under $2,000

How to Build This Self-Sustaining 14x14 Solar Cabin for Under $2,000

Homesteading is a broad term that involves living a lifestyle of self-reliance and self-sufficiency. It is a way of life that is slowly becoming more favorable thanks to its frugal nature, weaning off the reliance on overpriced and overproduced supermarket goods so that you can fully sustain yourself without outside help, house payments, and spending small fortunes on electricity and food.

Off the Grid by LaMar Alexander is an incredibly useful book with step-by-step guides and instructions to help you spark off and maintain this simpler lifestyle.  Alexander has been a homesteader himself for a number of years, so his own experiences combined with his knowledge as a health education specialist offers a wealth of information. After a divorce and sudden illness claimed nearly all of Alexander's money and assets, he decided to build his own home on a small piece of land that he inherited from his family's old homestead. He's been living there for over 15 years now, so he truly is an expert on the subject.

Alexanders’ General Project Overview Video

The book will teach you how to:

  • build a 14×14-foot cabin for under $2000 (which can be done in two weeks), and other building design styles (e.g. straw bale homes, yurts, and shipping containers)
  • install a solar and wind power system
  • install a wood stove
  • build a solar compost toilet, a hand power washing machine, pullet hot tub, outdoor wood furnace, solar water heaters and over 20 other projects
  • harvest rainwater and drill a water well
  • plant and raise a garden and animals (and their pens)
  • make a living from your homestead

If you feel like building this little cabin Alexander’s detailed book – Off the Grid costs 19.99$ on Amazon.com and you can read the reviews here.

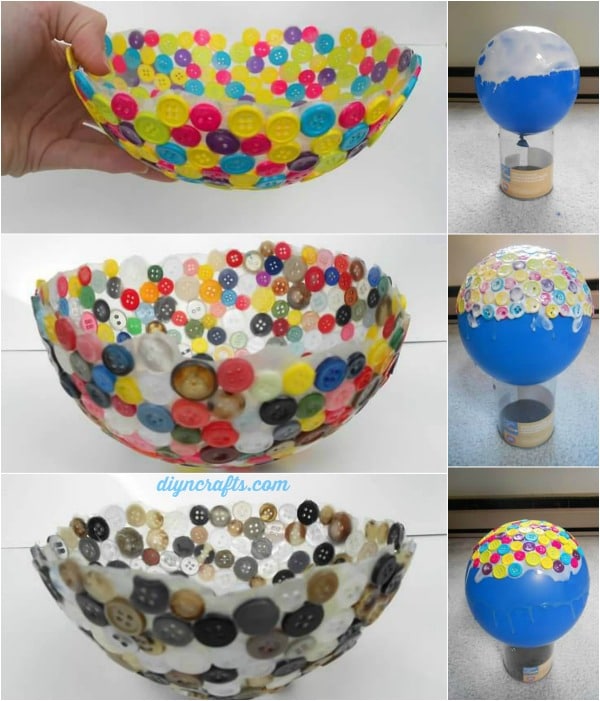
Brilliant Way to Impress Your Guests: Cute DIY Button Bowl

Brilliant Way to Impress Your Guests: Cute DIY Button Bowl
If you're one of those serious crafters with a box full of random buttons then it's about time you put them to good use. And even if you aren't a button aficionado, you'll soon become one when you see how easy it is to make this charming button bowl; all you have to do, literally, is glue buttons onto a balloon! If you're a mommy then something like this could look adorable in your baby or kid's room, otherwise, it's also a great holder for all your little crafty odds and ends.

Don't let your button assortment limit your creativity, though – there's a lot you can do with this clever technique. For example, use buttons that are all different shades of a specific color, use only retro buttons for a funkier look, or even create a pattern with alternating colors.

Button Bowl – DIY Instructions

Go button wild!

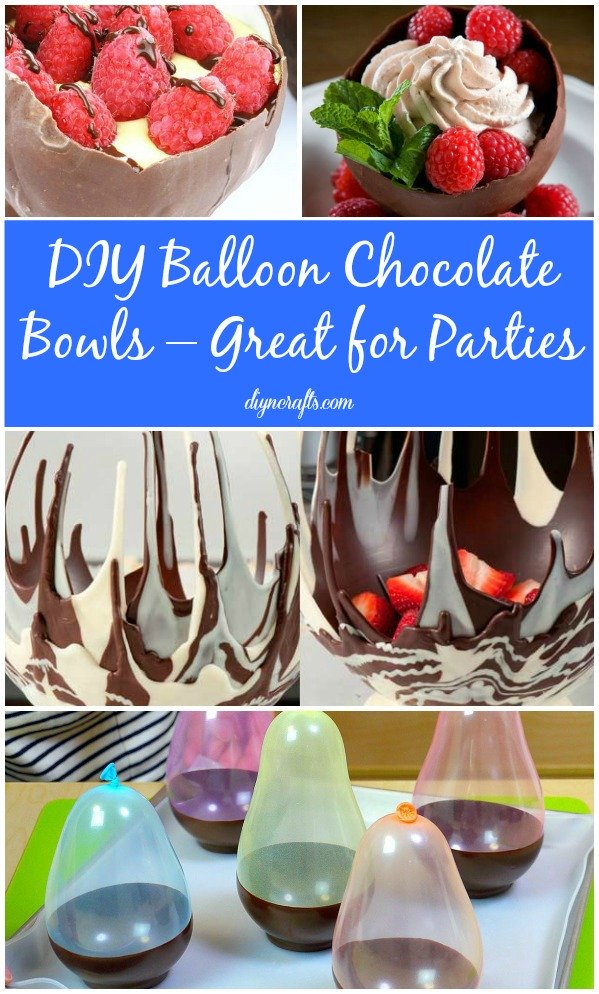
If you wan’t to take this to the next level check out our chocolate bowl tutorial.

Chocolate bowl Tutorial

DIY Balloon Chocolate Bowls – Great for Parties – http://www.diyncrafts.com/4660/food/diy-balloon-chocolate-bowls-great-parties

How to DIY Colorful Rainbow Roses Step by Step Video Instructions

How to DIY Colorful Rainbow Roses Step by Step Video Instructions! Unique diy project,

How often has it happened that you have a specific event or occasion that you want to get flowers for but can't find the perfect array of colors to suit the theme? Sadly, for us, it's happened too many times, and it can be rather frustrating to have to settle with second best. So, working with white roses as your template, we'll show you how you can turn them to any color your heart desires! Of course, you can use this food coloring technique with practically any white flower (like daisies or carnations), but roses are our favorite.

Top Tips:

The flowers need to be fresh; if they're limp or wilted then they may not absorb the water and coloring quite as well.

Making a slated cut in the stem is very important since it prevents the stem from sitting flat at the bottom of the glass which could stop it from taking in the water.

If you want to make it really fancy and have more than one color in a single flower, split the bottom half of the stem so that you have as many segments as you want colors. Then position the flower so that each segment sits in its own glass of food coloring – a bit of tape may help here to ensure that the flower remains upright. After about 24 hours you'll end up with a rainbow rose instead of a rainbow bunch!